Install
- Before you start
- Get the app
- 2nd & 3rd generation
- 1st generation
- After patching
- Troubleshooting
- Credits
unfr0zen patches the thermostat over USB from your computer: Nest's own software stays, and local control is added to it. About ten minutes and no tools on a 2nd or 3rd generation; a 1st generation has to be opened up.
Before you start
3rd generation
The largest display of the three.
- Cable
- micro-USB
- Tools
- none
2nd generation
Thinner than the 1st.
- Cable
- micro-USB
- Tools
- none
1st generation
“Model: 01A” printed on the back.
- Cable
- mini-USB
- Tools
- small Phillips screwdriver, plastic pry tool, metal tweezers
Not sure? Plug the display into the computer with the app open: the Patch page shows which generation it found. The Nest Thermostat E is recognised and refused.
- A USB cable that carries data. Many cables only charge; they're the most common reason a thermostat isn't found. Plug it straight into the computer, not through a hub.
- Some charge in the battery. If the thermostat has been sitting unpowered, leave it on its base or on USB for a while first: it restarts several times during a run.
- A computer running Windows 10 or later, macOS 13 or later, or Linux.
Get the app
Do this once, on the computer you'll plug the thermostat into.
1Download it
- Open the download page. It picks your computer's system for you; if it's wrong, click macOS, Windows or Linux.
- Click the first button:
- macOS (Universal) works on every Mac.
- Windows (x86_64) is right for almost every PC. Choose Windows (arm64) only if the PC has a Snapdragon processor.
- The file lands in your Downloads folder.
2Open it the first time
On a Mac:
- Open Downloads in Finder and double-click the
.zipfile. unfr0zen appears next to it. You can drag it into Applications. - Double-click unfr0zen. macOS says it can't check the app for malicious software, because the app isn't registered with Apple. Click Done.
- Open the Apple menu → System Settings → Privacy & Security, scroll down to Security, and click Open Anyway next to the message about unfr0zen. Enter your Mac's password if it asks.
- Double-click unfr0zen again and click Open Anyway. From now on it opens like any other app.
On Windows:
- Open Downloads, right-click the
.zipfile and choose Extract All…, then Extract. - In the folder that opens, double-click unfr0zen.
- If a blue box says Windows protected your PC, click More info, then Run anyway. The app isn't signed by a company Windows knows, so it warns once.
- For a 1st or 2nd generation thermostat, Windows asks Do you want to allow this app to make changes to your device? the first time: click Yes. This installs the driver the app needs to talk to the thermostat.
On Linux: unpack the download, run ./unfr0zen, and add the USB rule shown on the download page once, so the app can reach the thermostat.
2nd & 3rd generation
Both use the same steps, and the app walks you through them. You don't need any tools. Allow about half an hour.
1Take the display off and plug it in
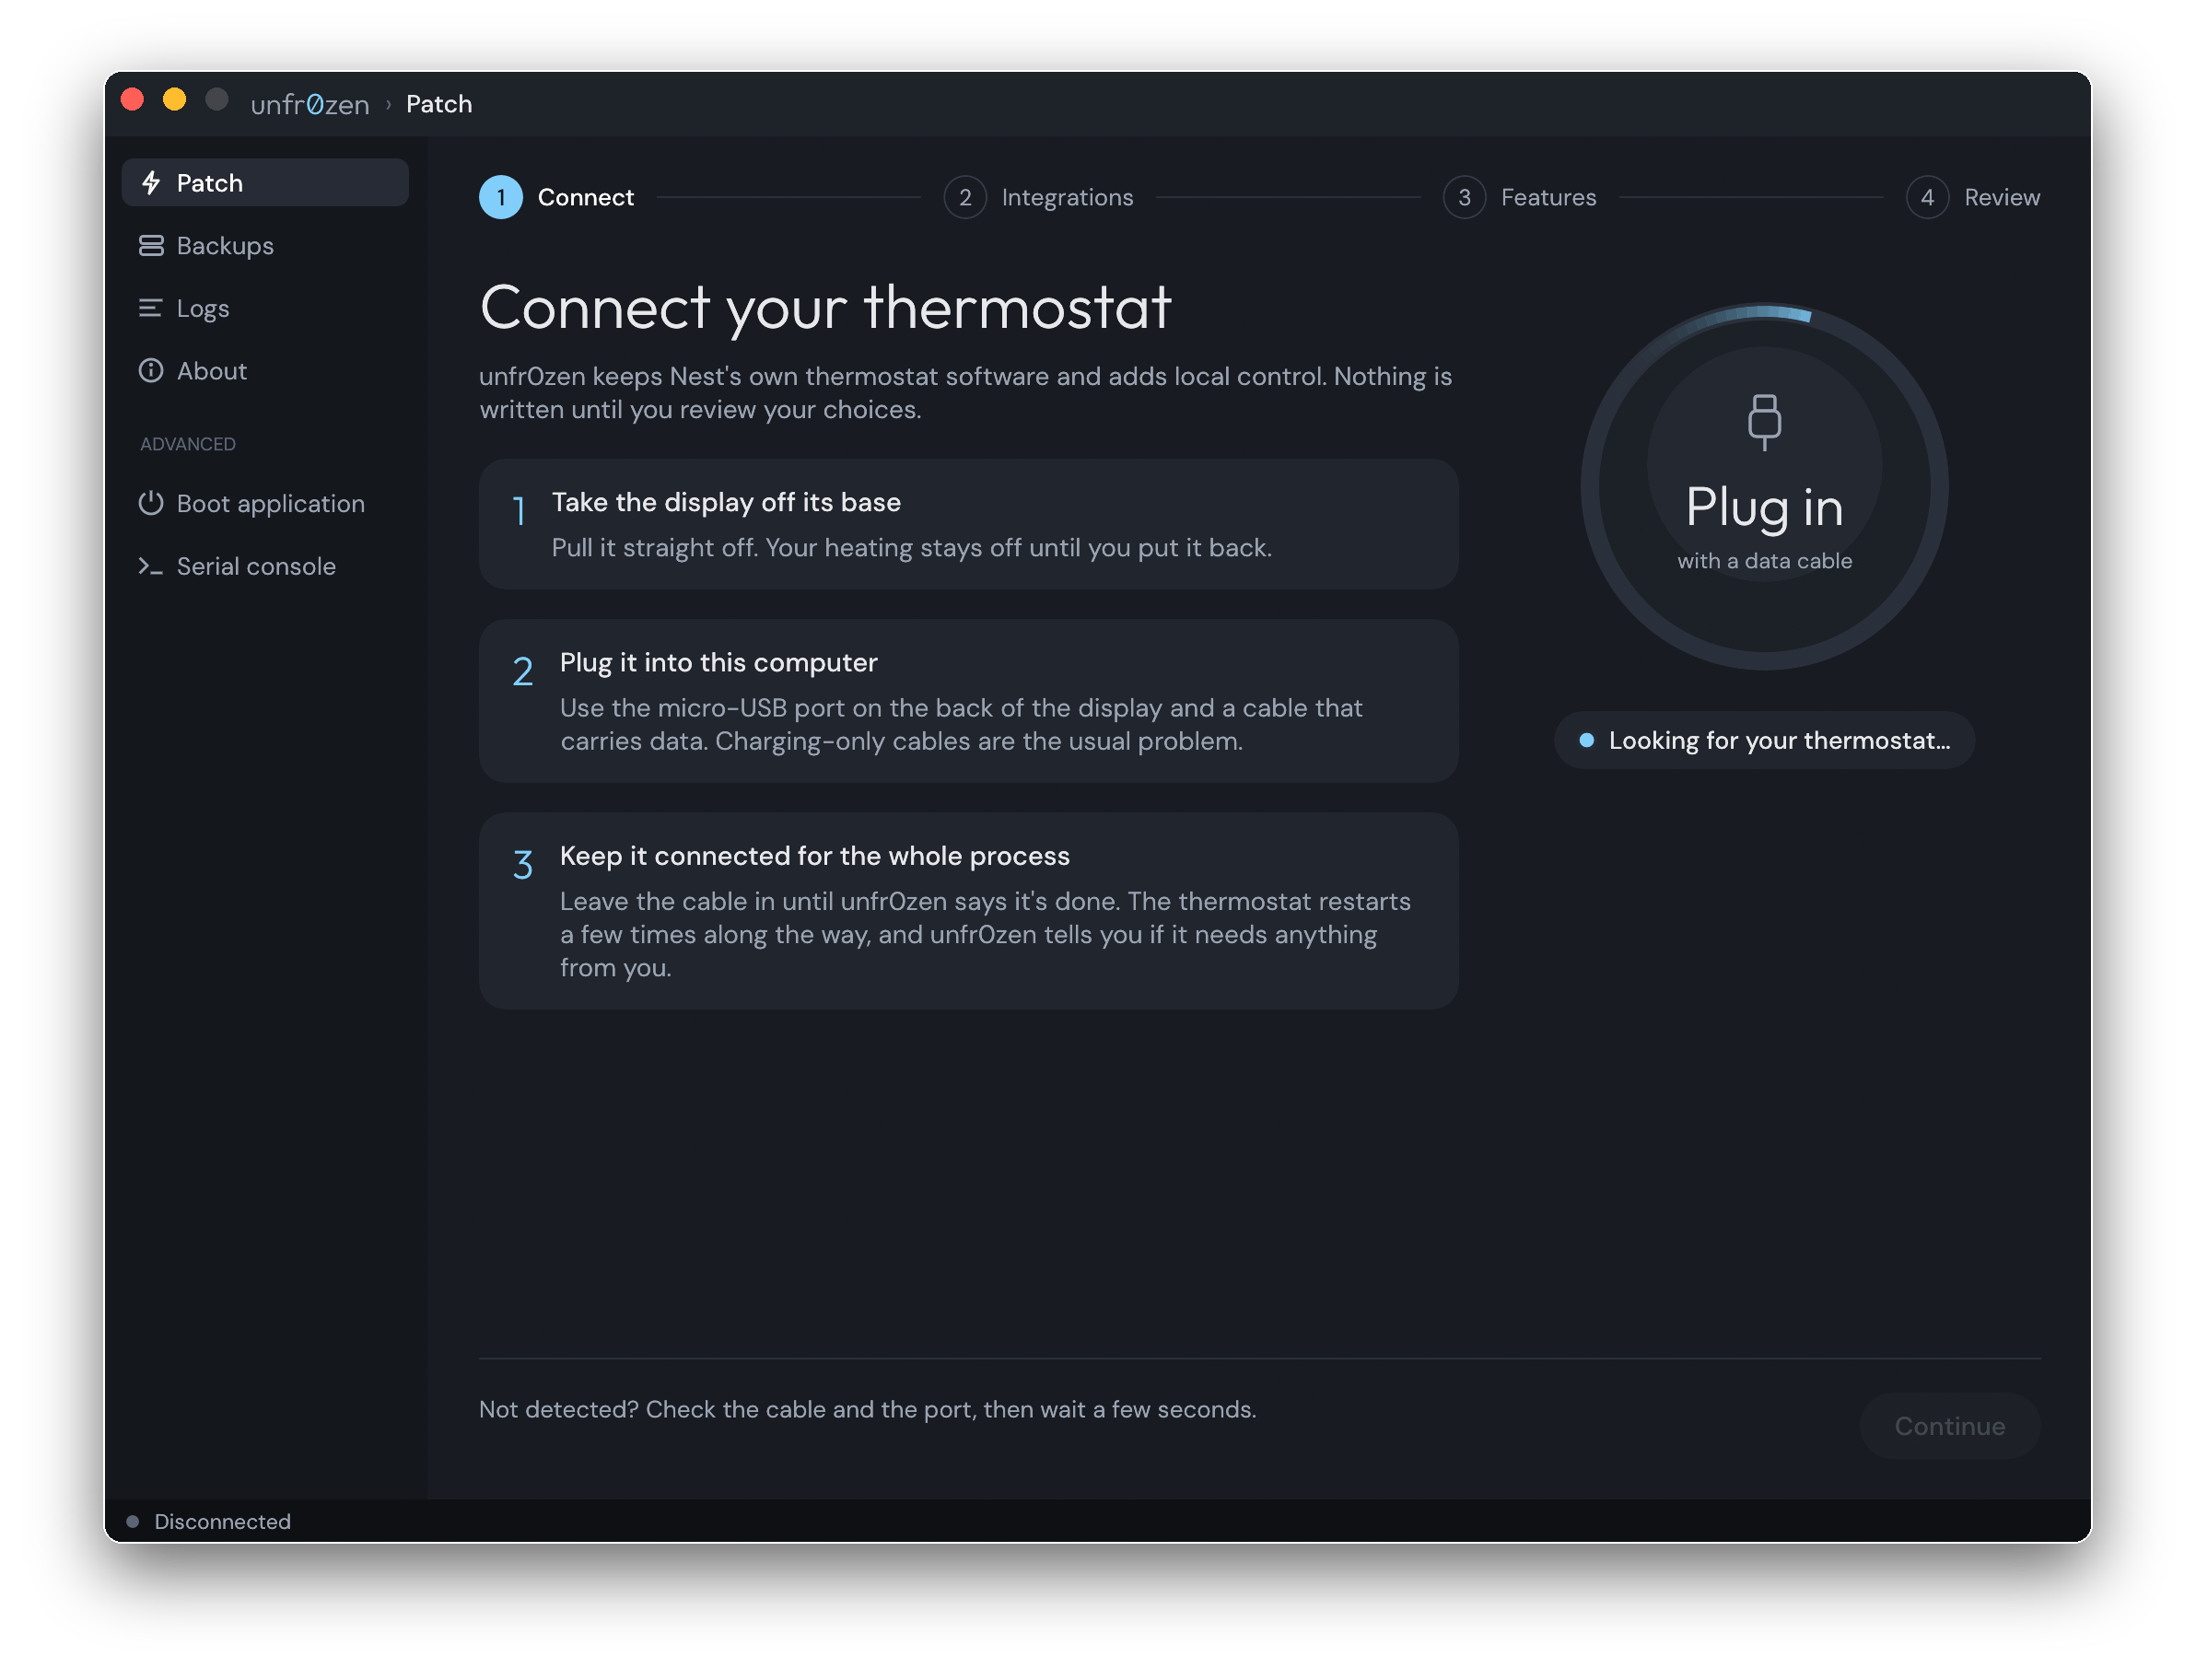
- Open unfr0zen. It starts on the Patch page, at Connect.
- Hold the thermostat's display by its ring and pull it straight towards you, off the wall. The heating stays off until you put it back.
- Turn it over to find the small USB port on the back.
- Plug the small end of the cable into it, and the other end into the computer.
2Check the app has found it
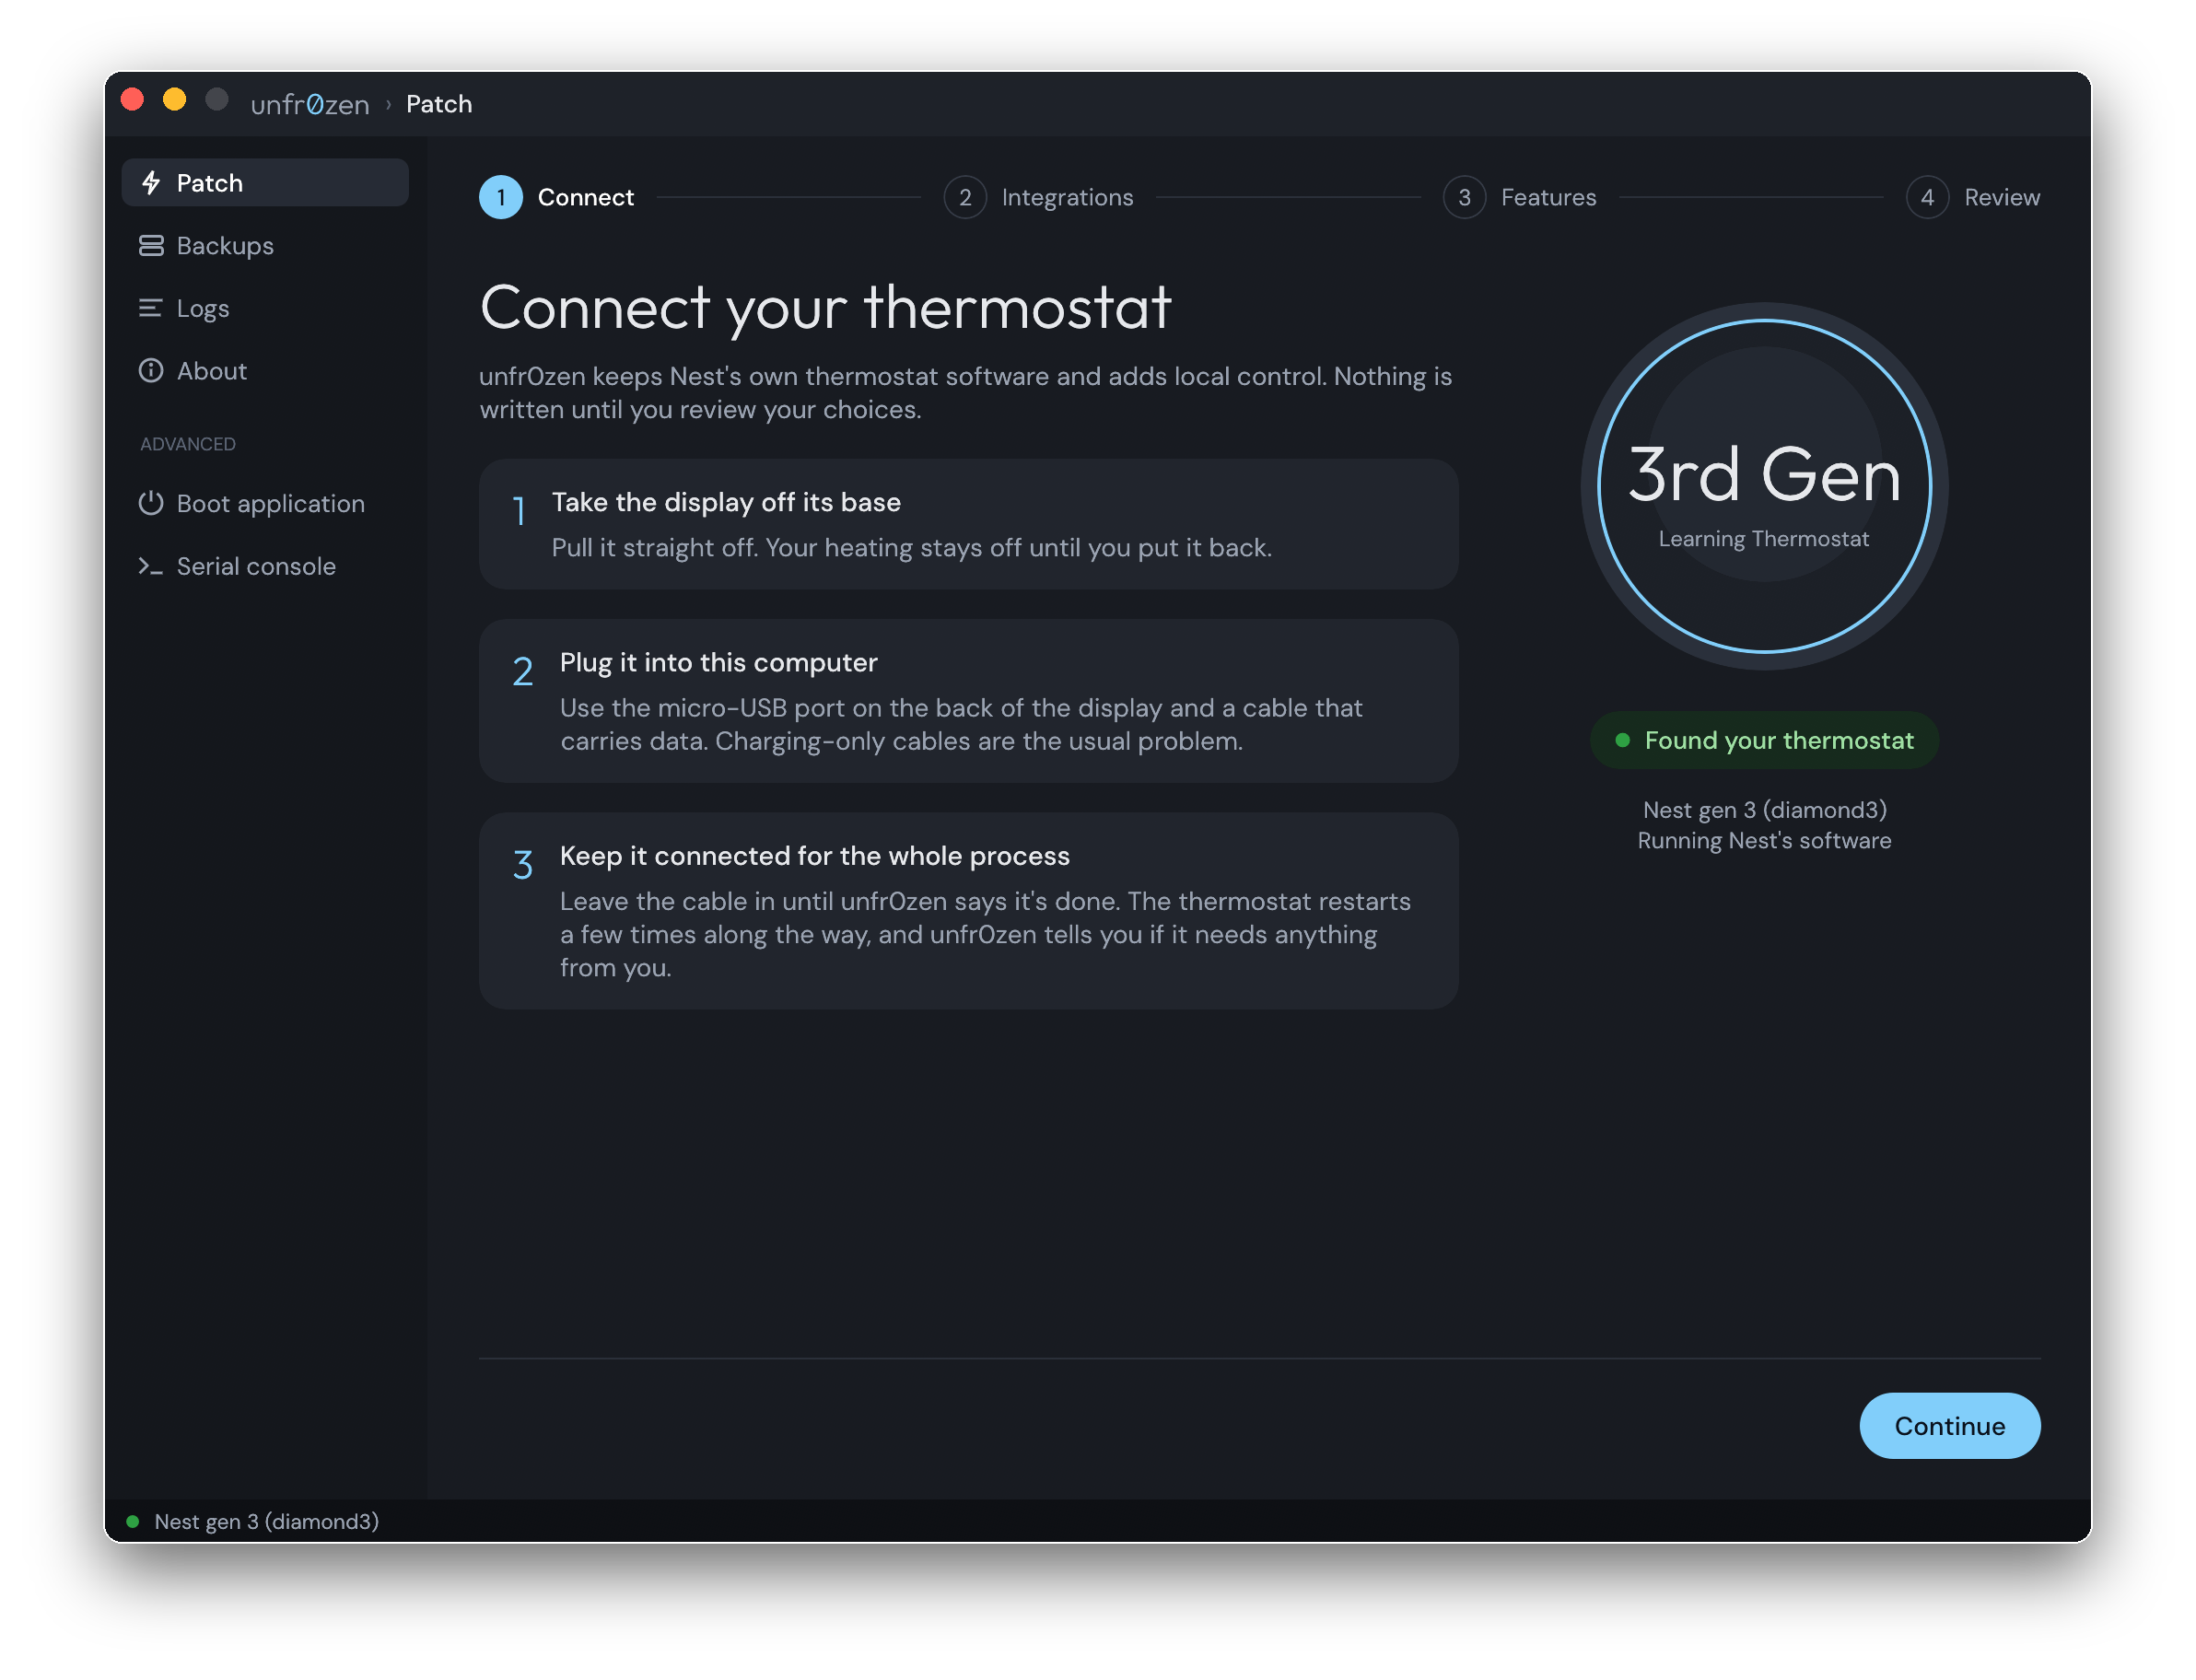
- Within a few seconds the ring shows the generation and a green Found your thermostat.
- Click Continue, at the bottom right.
Still Looking for your thermostat… after half a minute? Try another cable: many cables only charge, and can't carry data. Plug it straight into the computer, not into a hub or a screen.
3Choose what to add
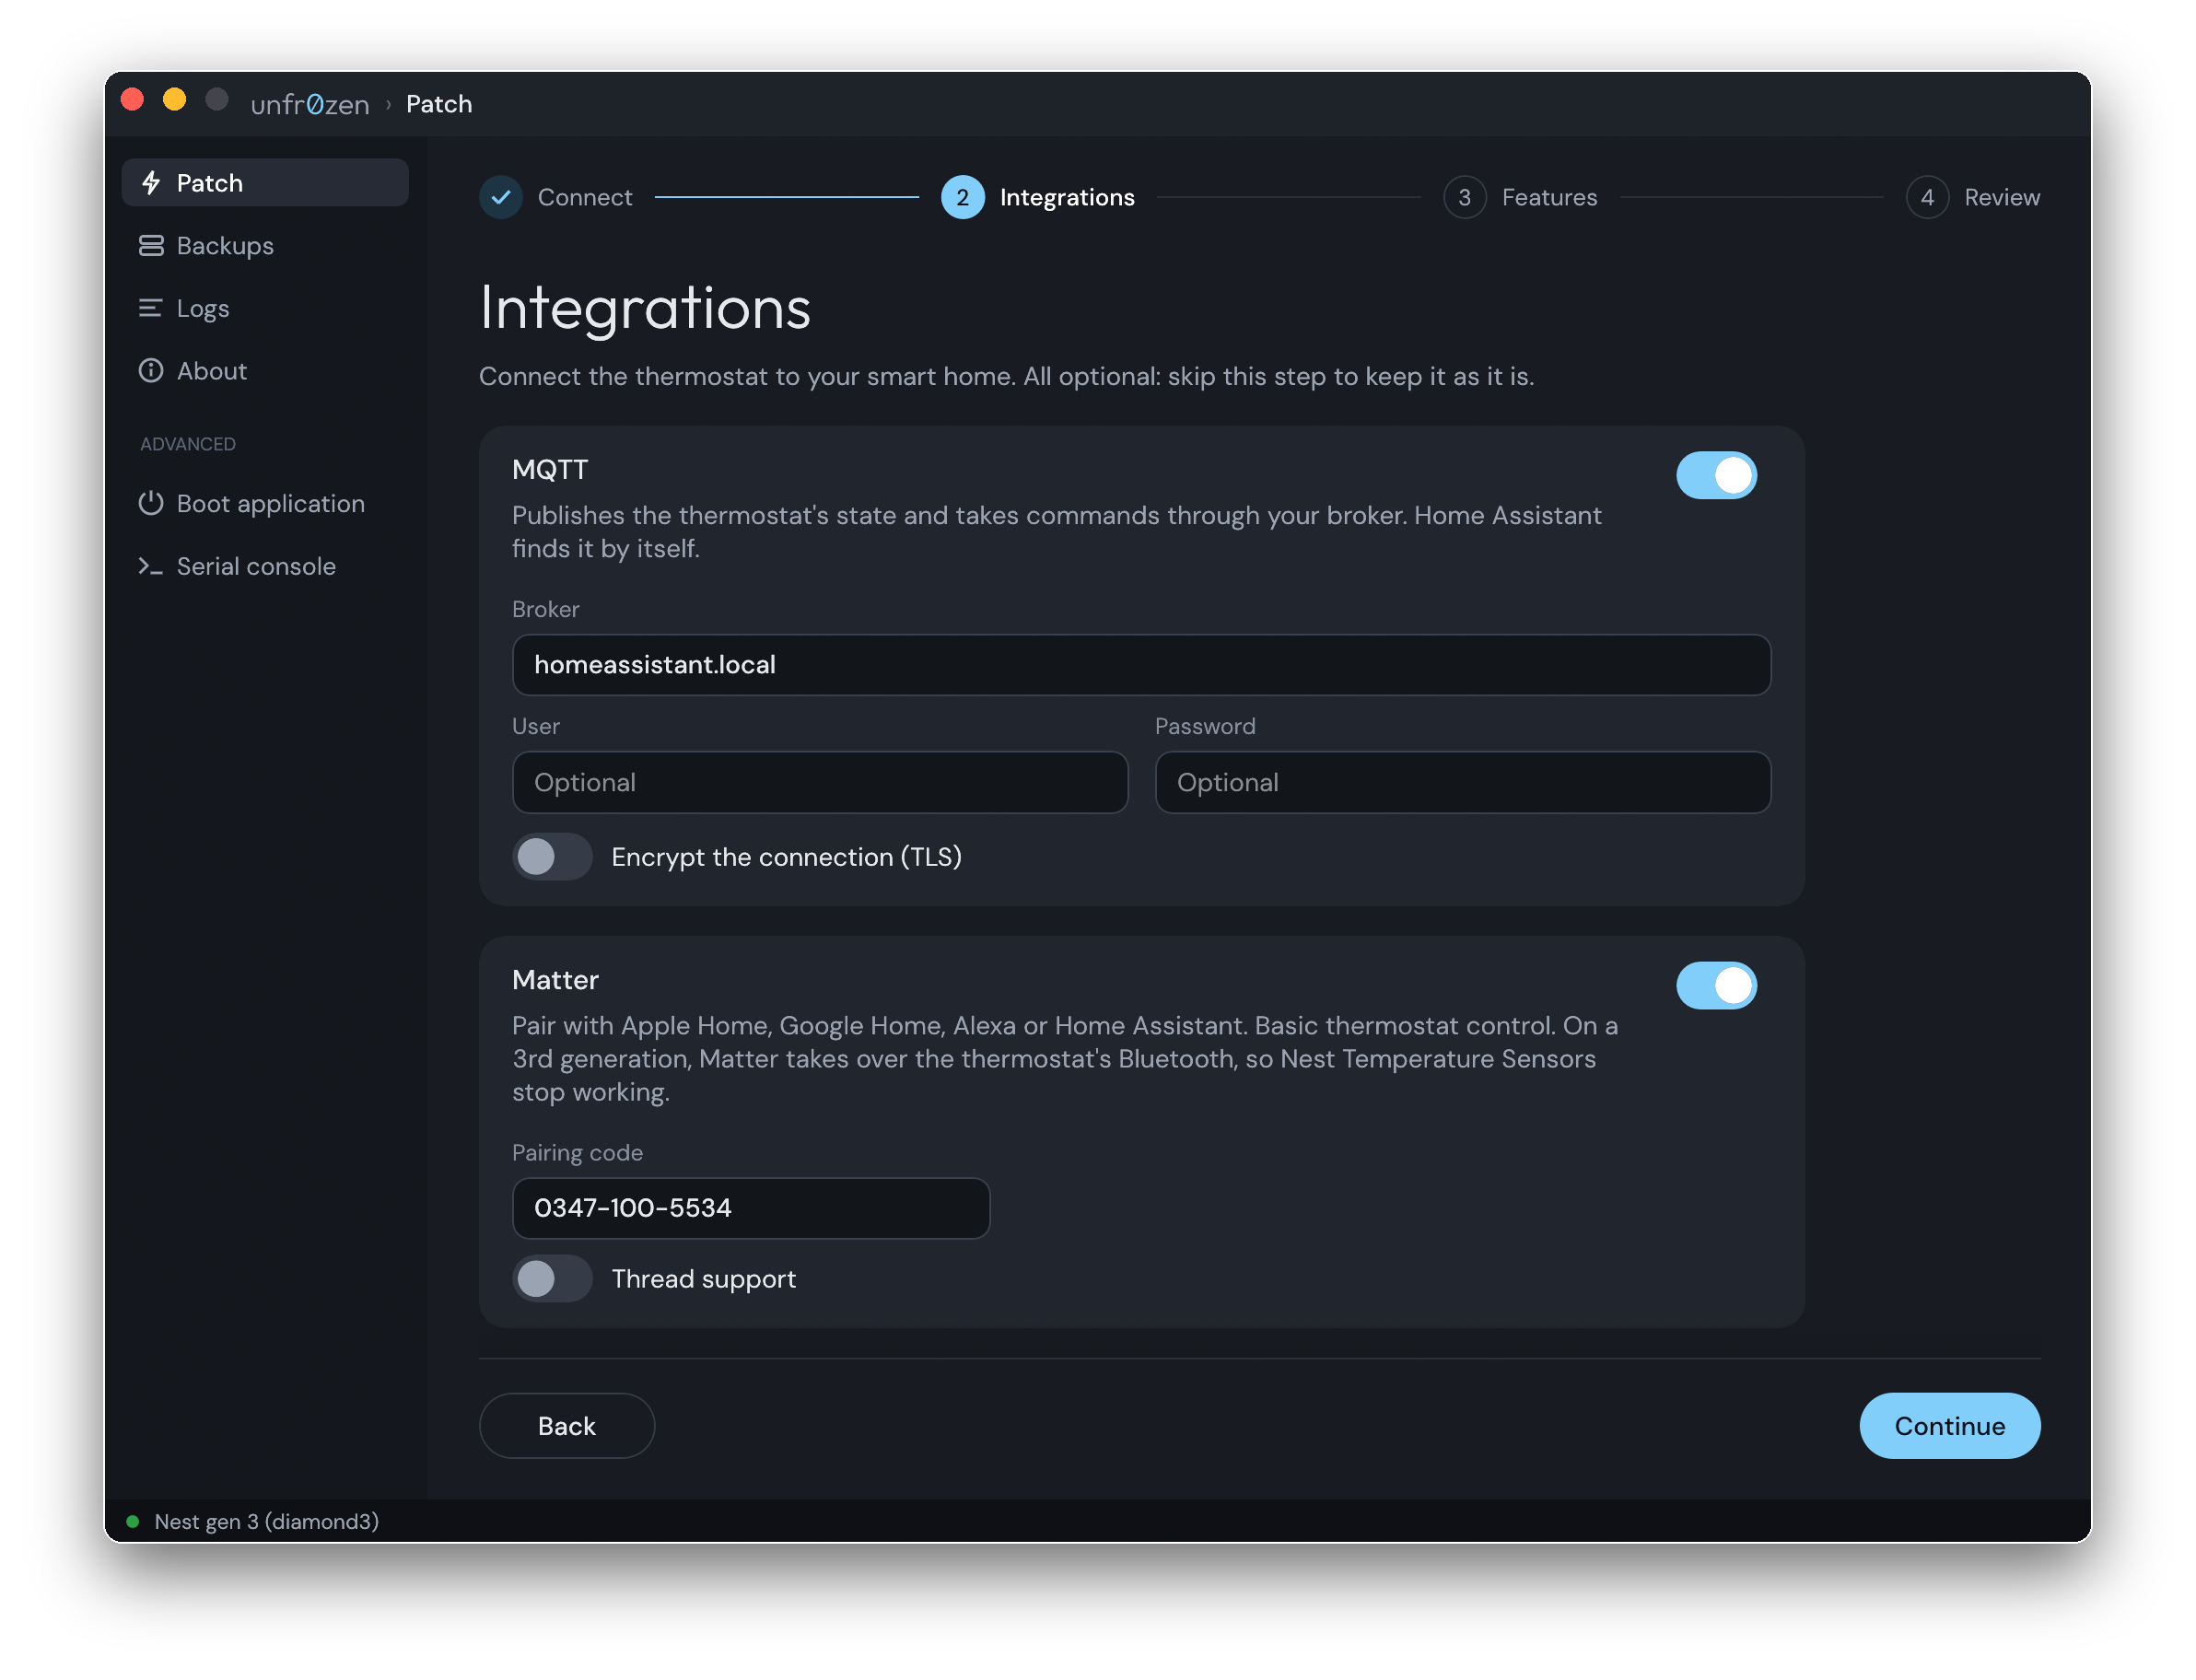
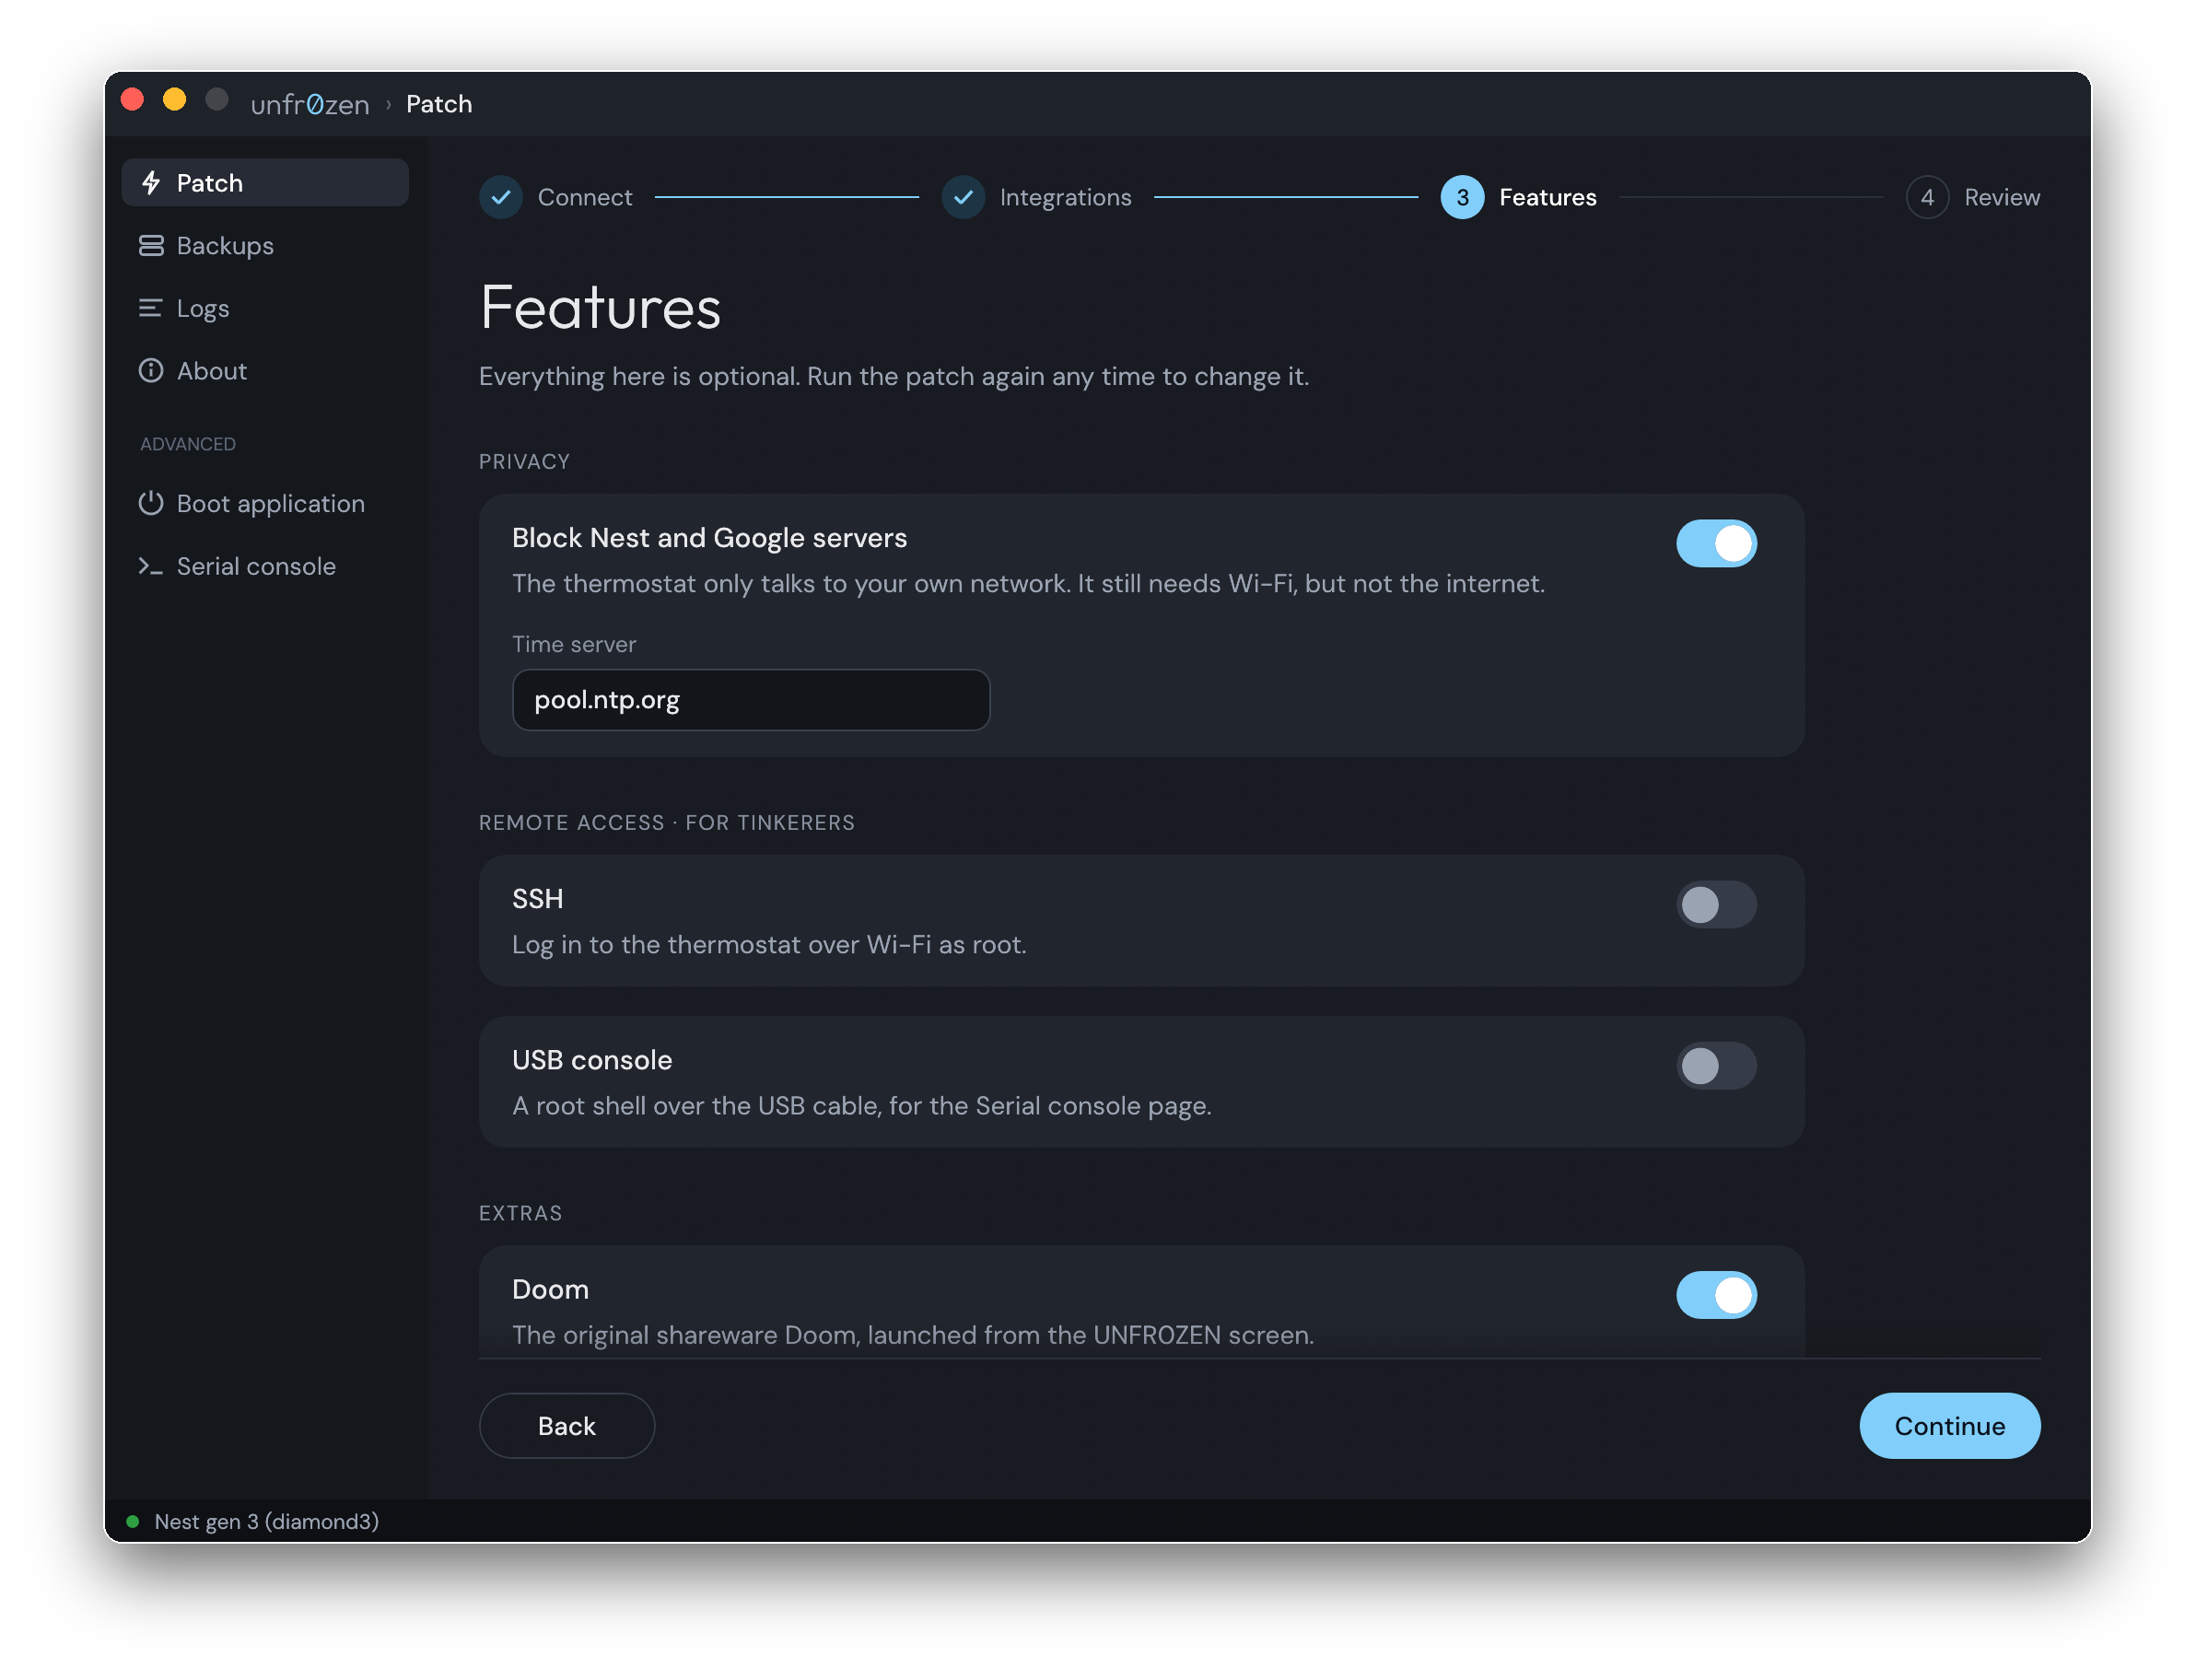
- On Integrations, switch on the ones your smart home uses and fill in what each asks for. Integrations explains each one. Not sure? Leave them all off: you can run the patch again later.
- Click Continue.
- On Features, do the same, then click Continue.
4Start, with a backup
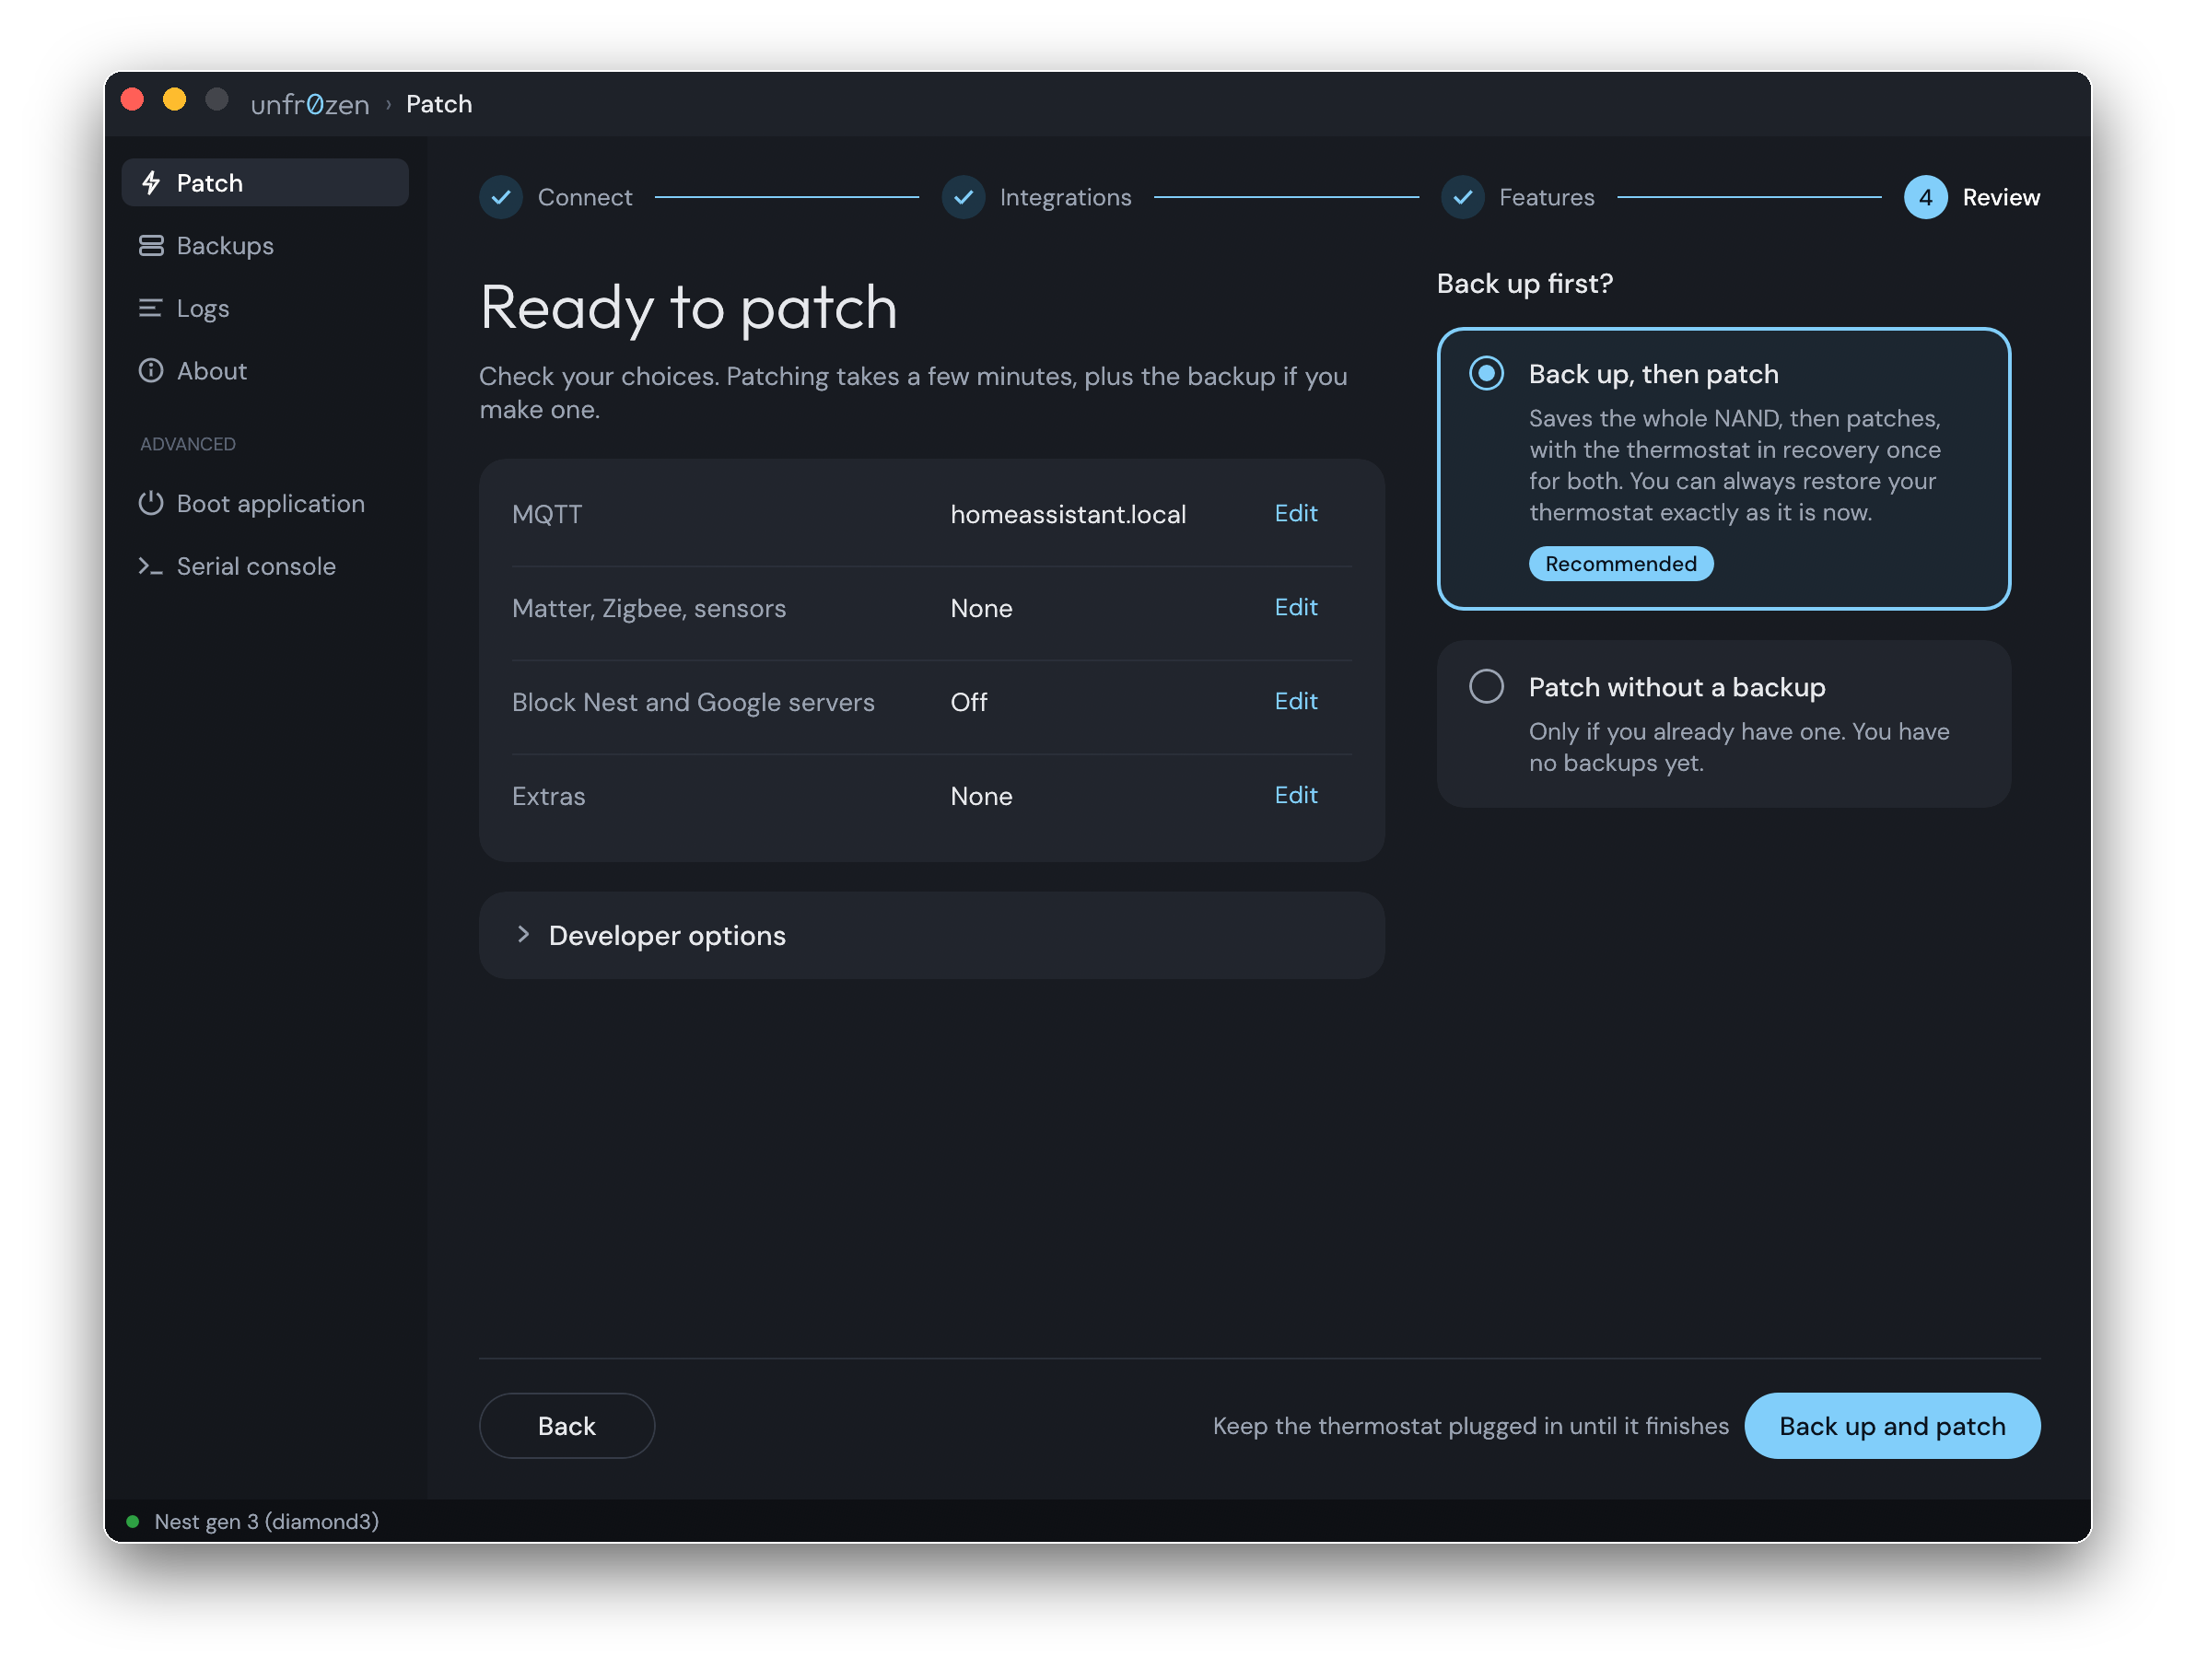
- Review lists what you chose. Click Edit next to anything you want to change.
- Leave Back up, then patch selected. The backup is a copy of everything on the thermostat, so it can always be put back exactly as it was.
- Click Back up and patch, at the bottom right.
5Press and hold the display
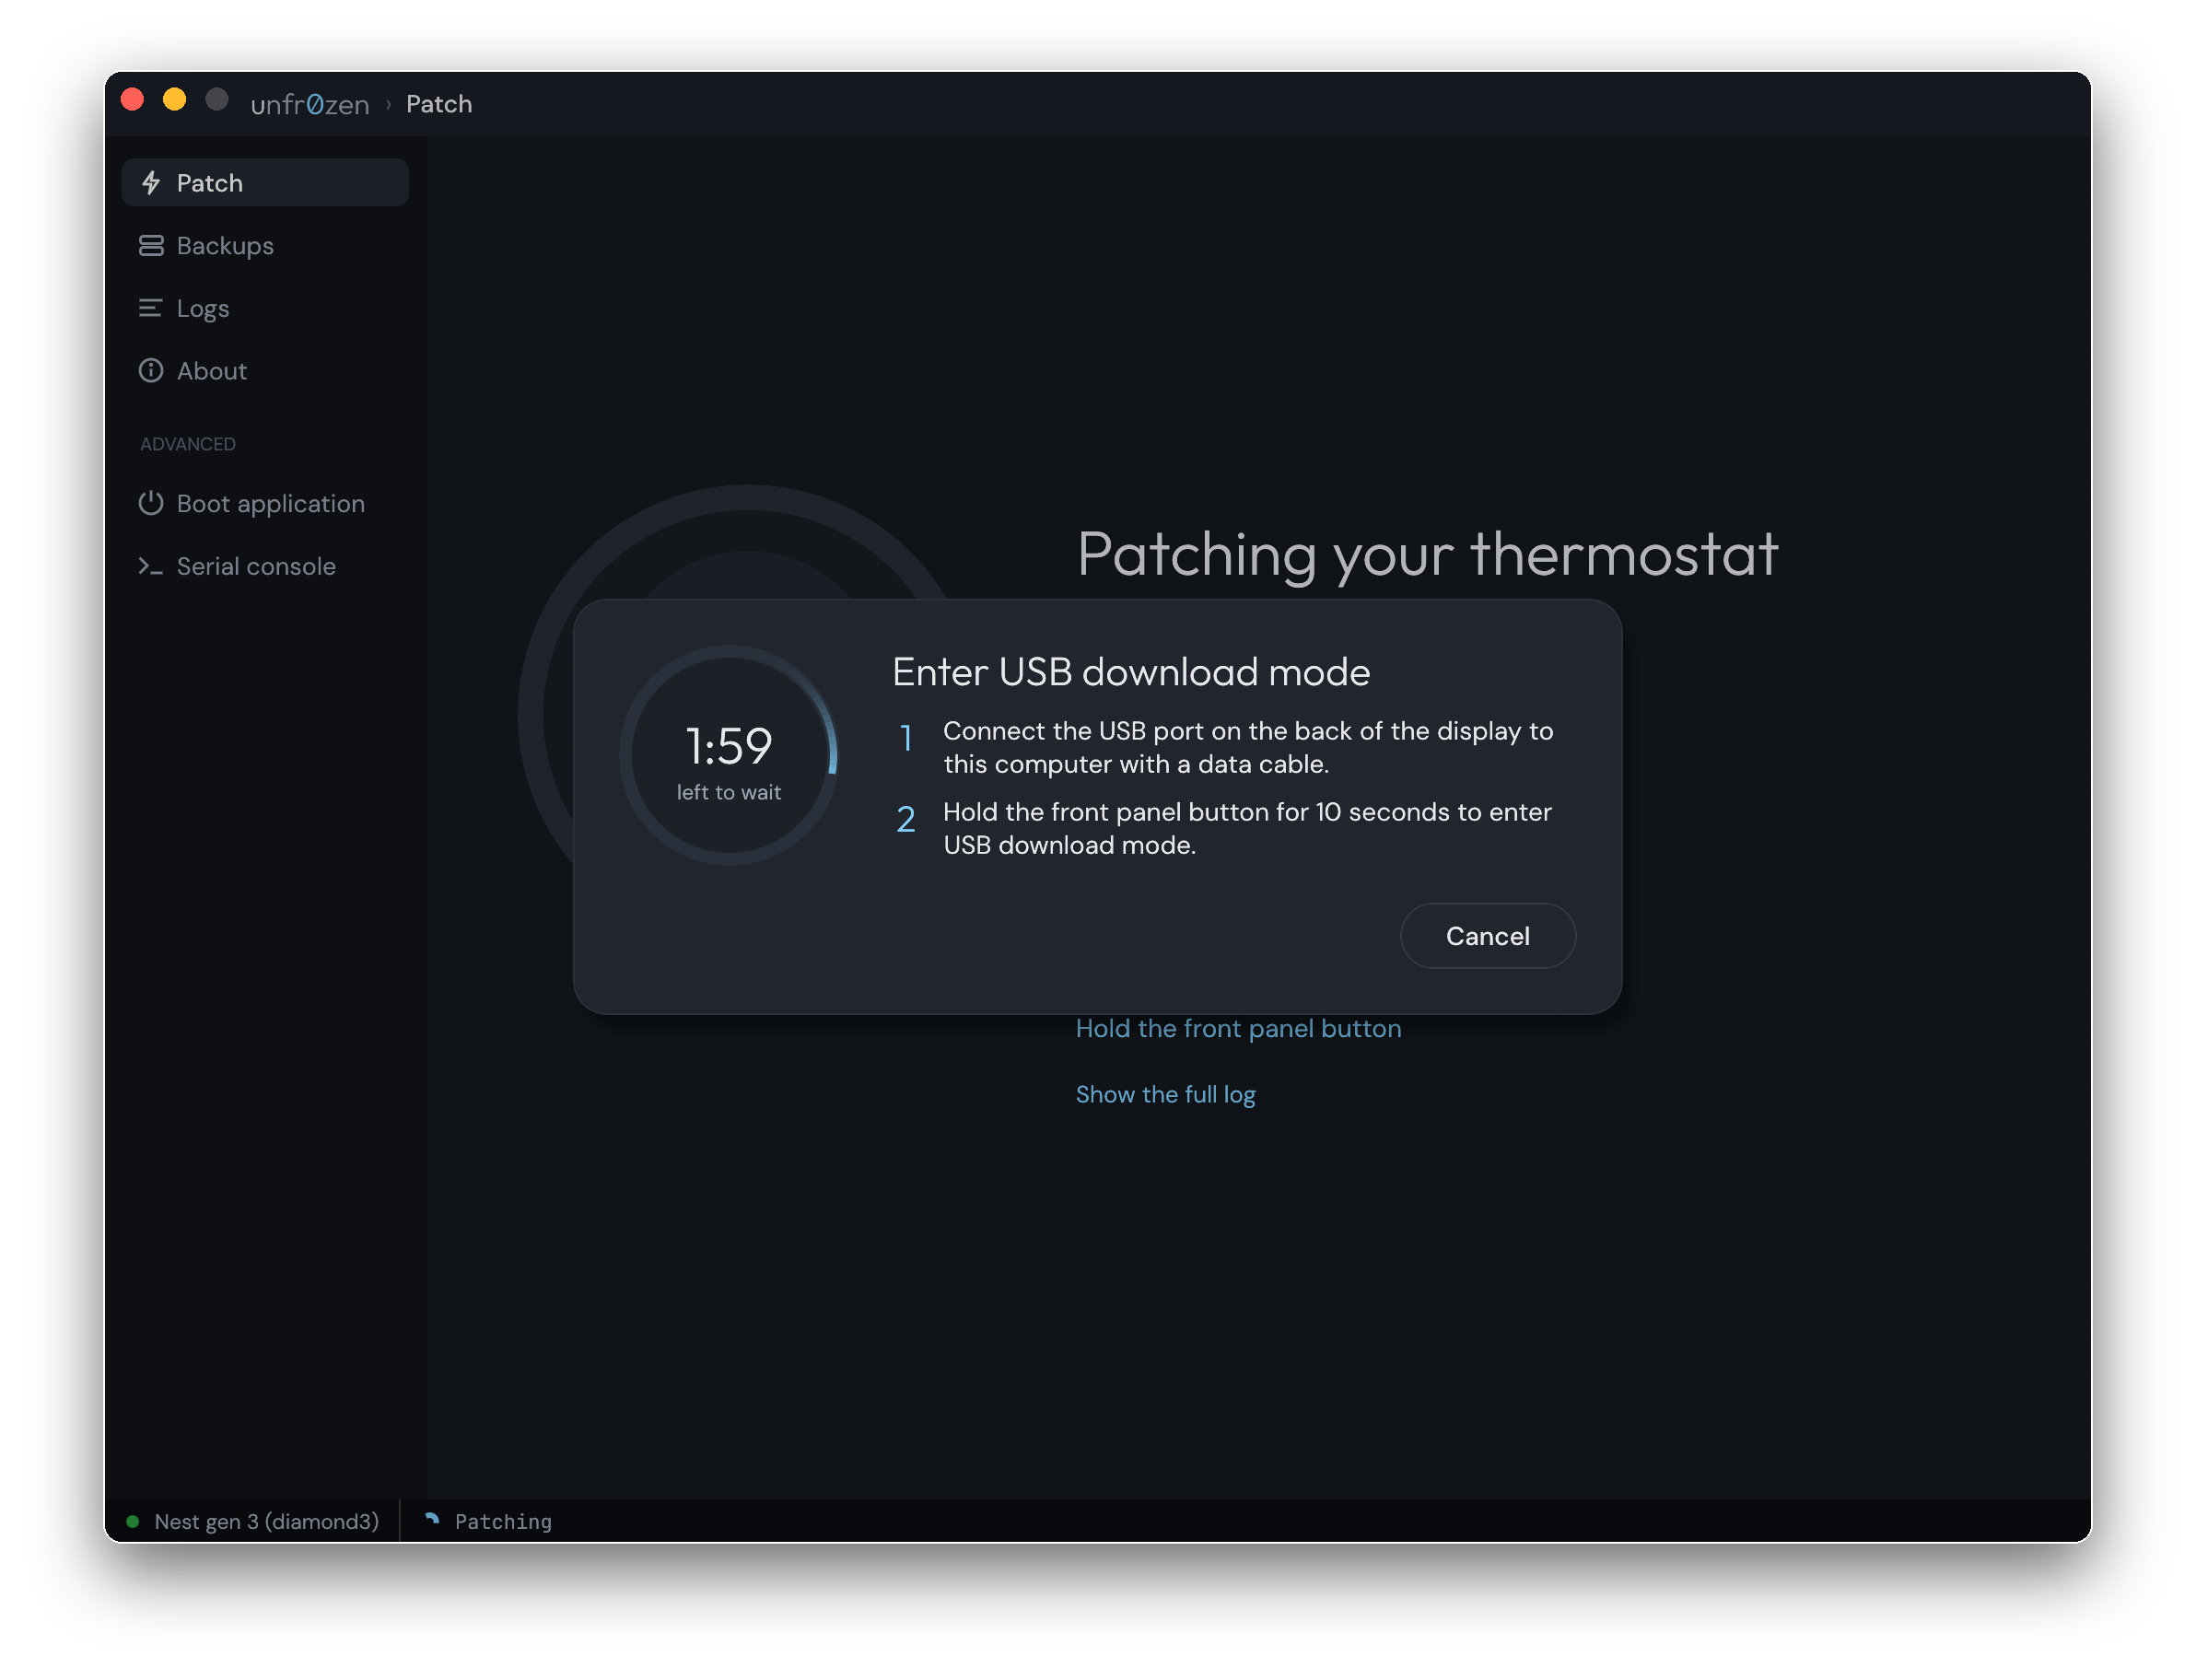
- A window titled Enter USB download mode appears.
- With the cable still plugged in, press the middle of the display in, like a button, and keep it pressed for about 10 seconds, until the screen goes dark.
- Let go. The window closes by itself once the app has the thermostat.
You have 2 minutes. If the time runs out, the run stops before changing anything: click Back to review, then Back up and patch again.
6Wait
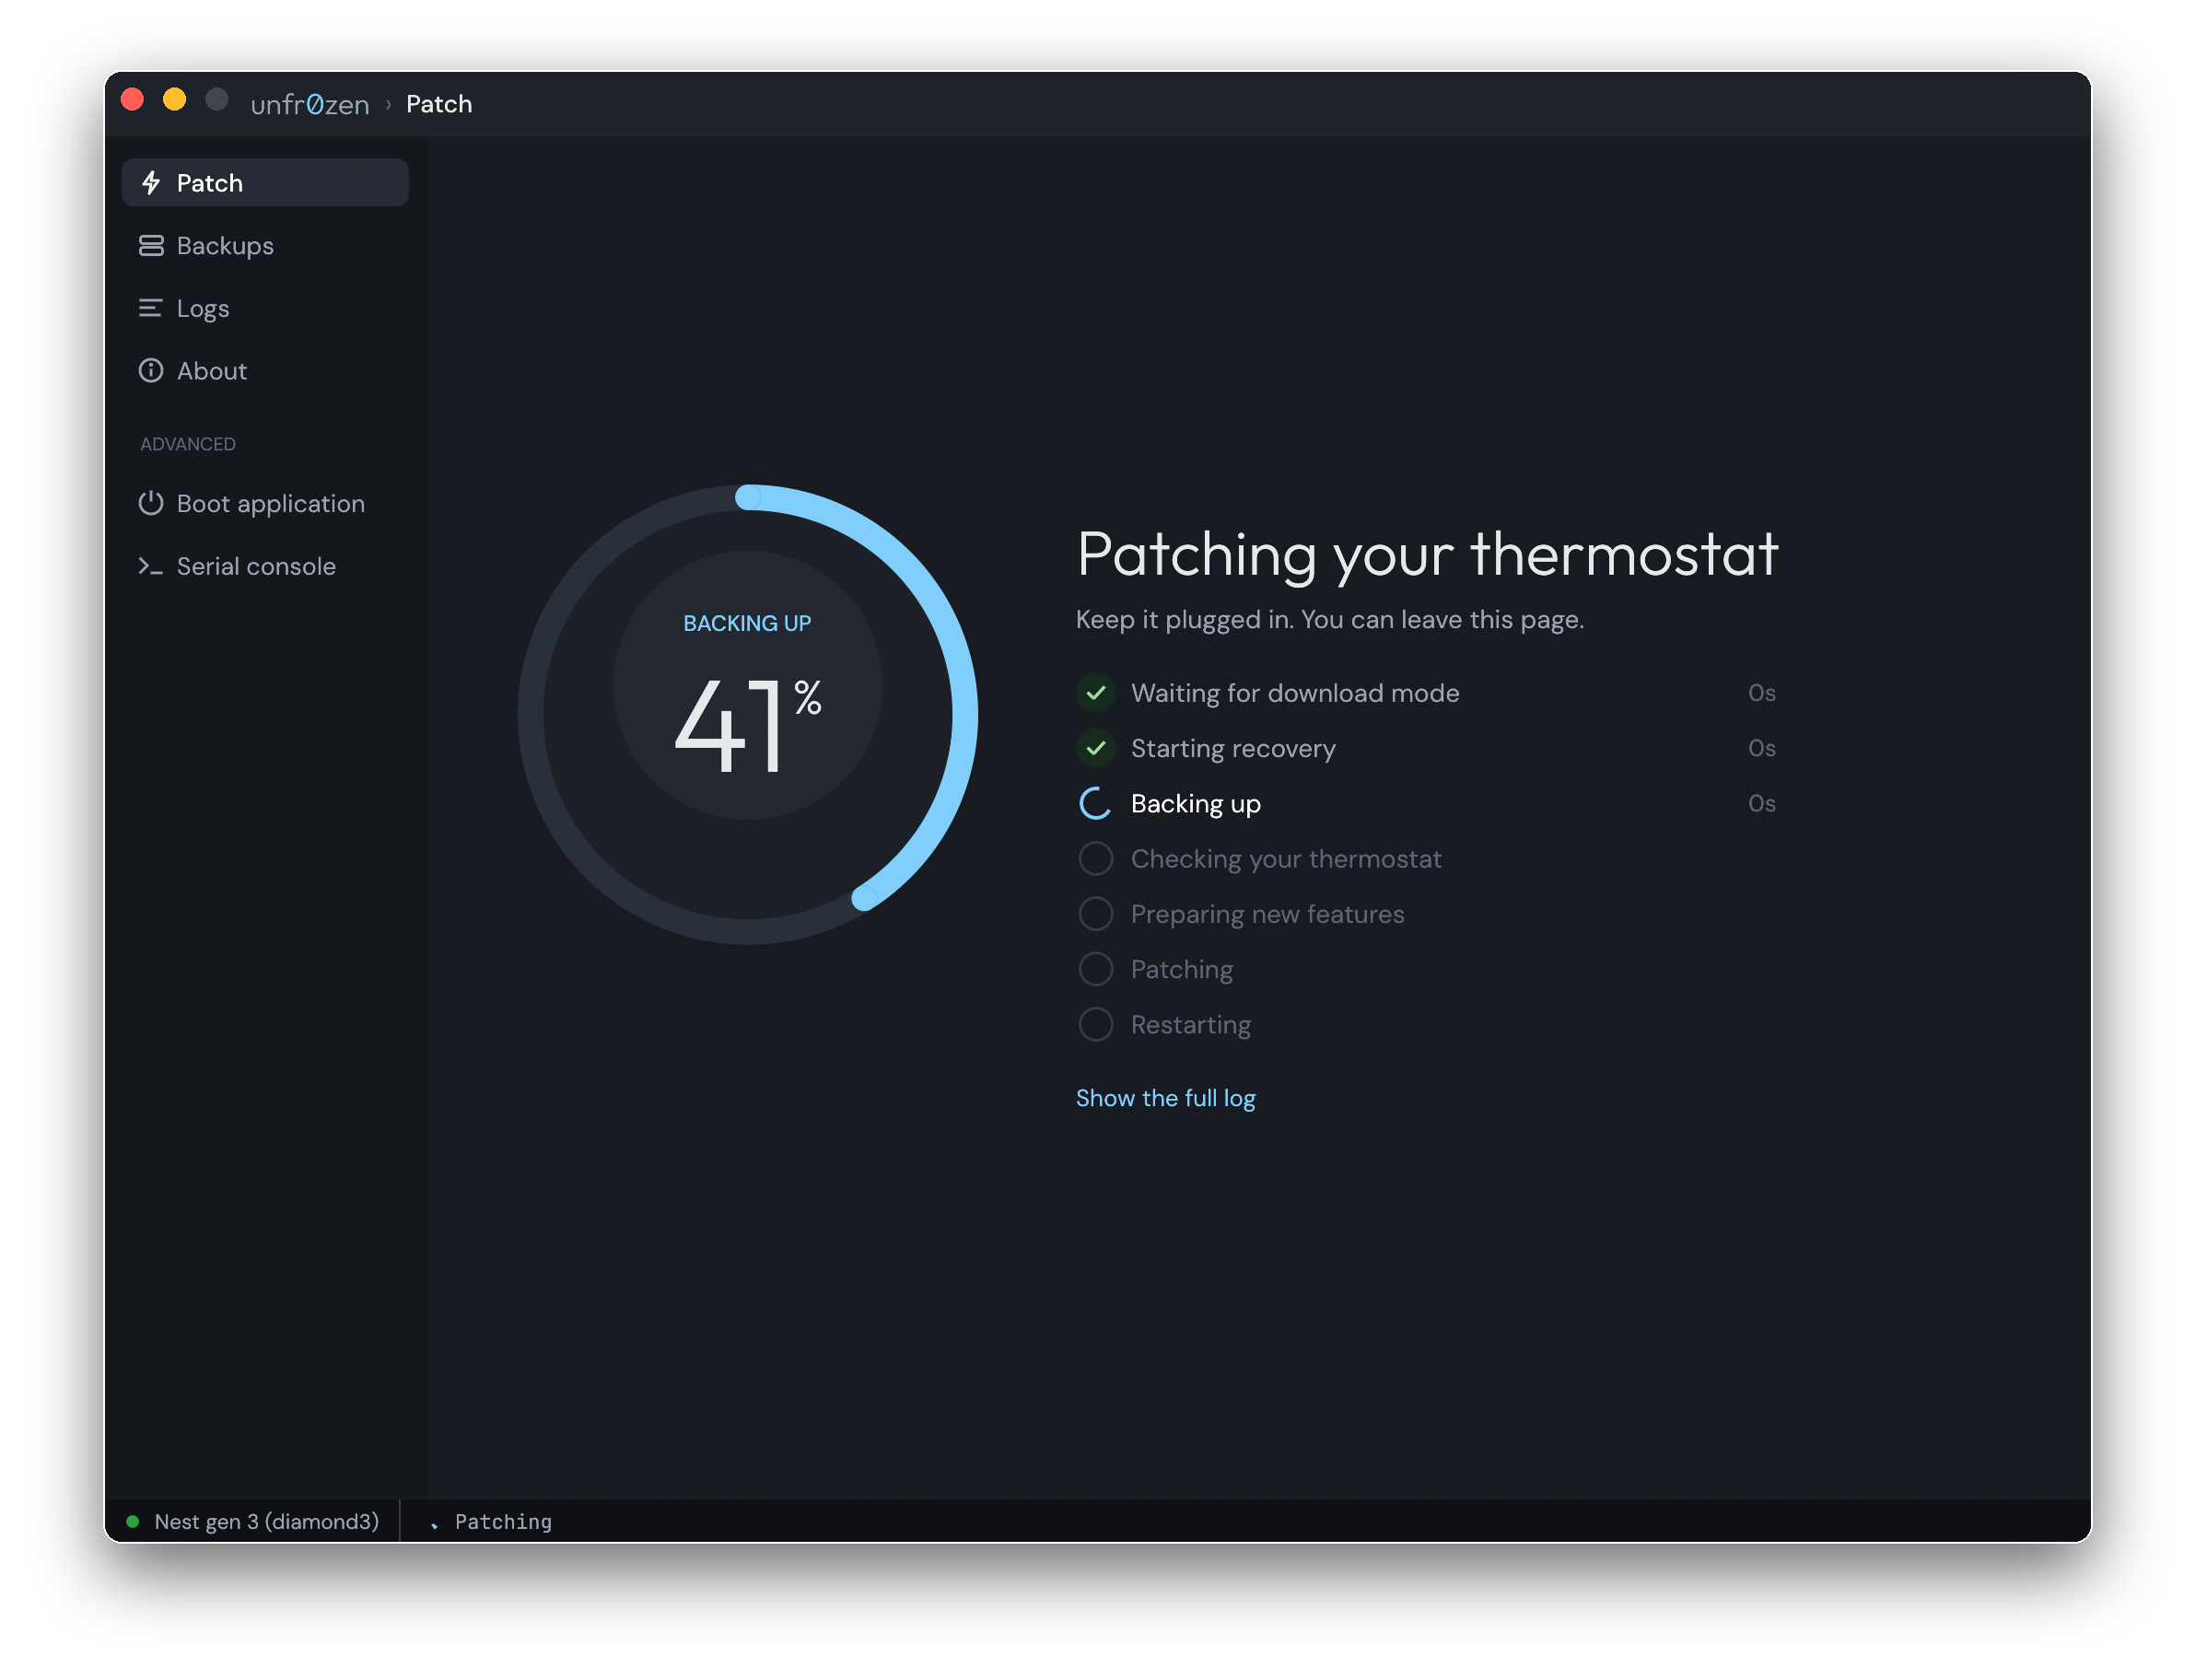
- Don't unplug the cable or touch the display. The backup takes the longest; patching takes a few minutes more.
- The thermostat's screen goes dark and lights up again a few times. That's normal.
- If the app needs you again, it tells you what to do.
7Put it back
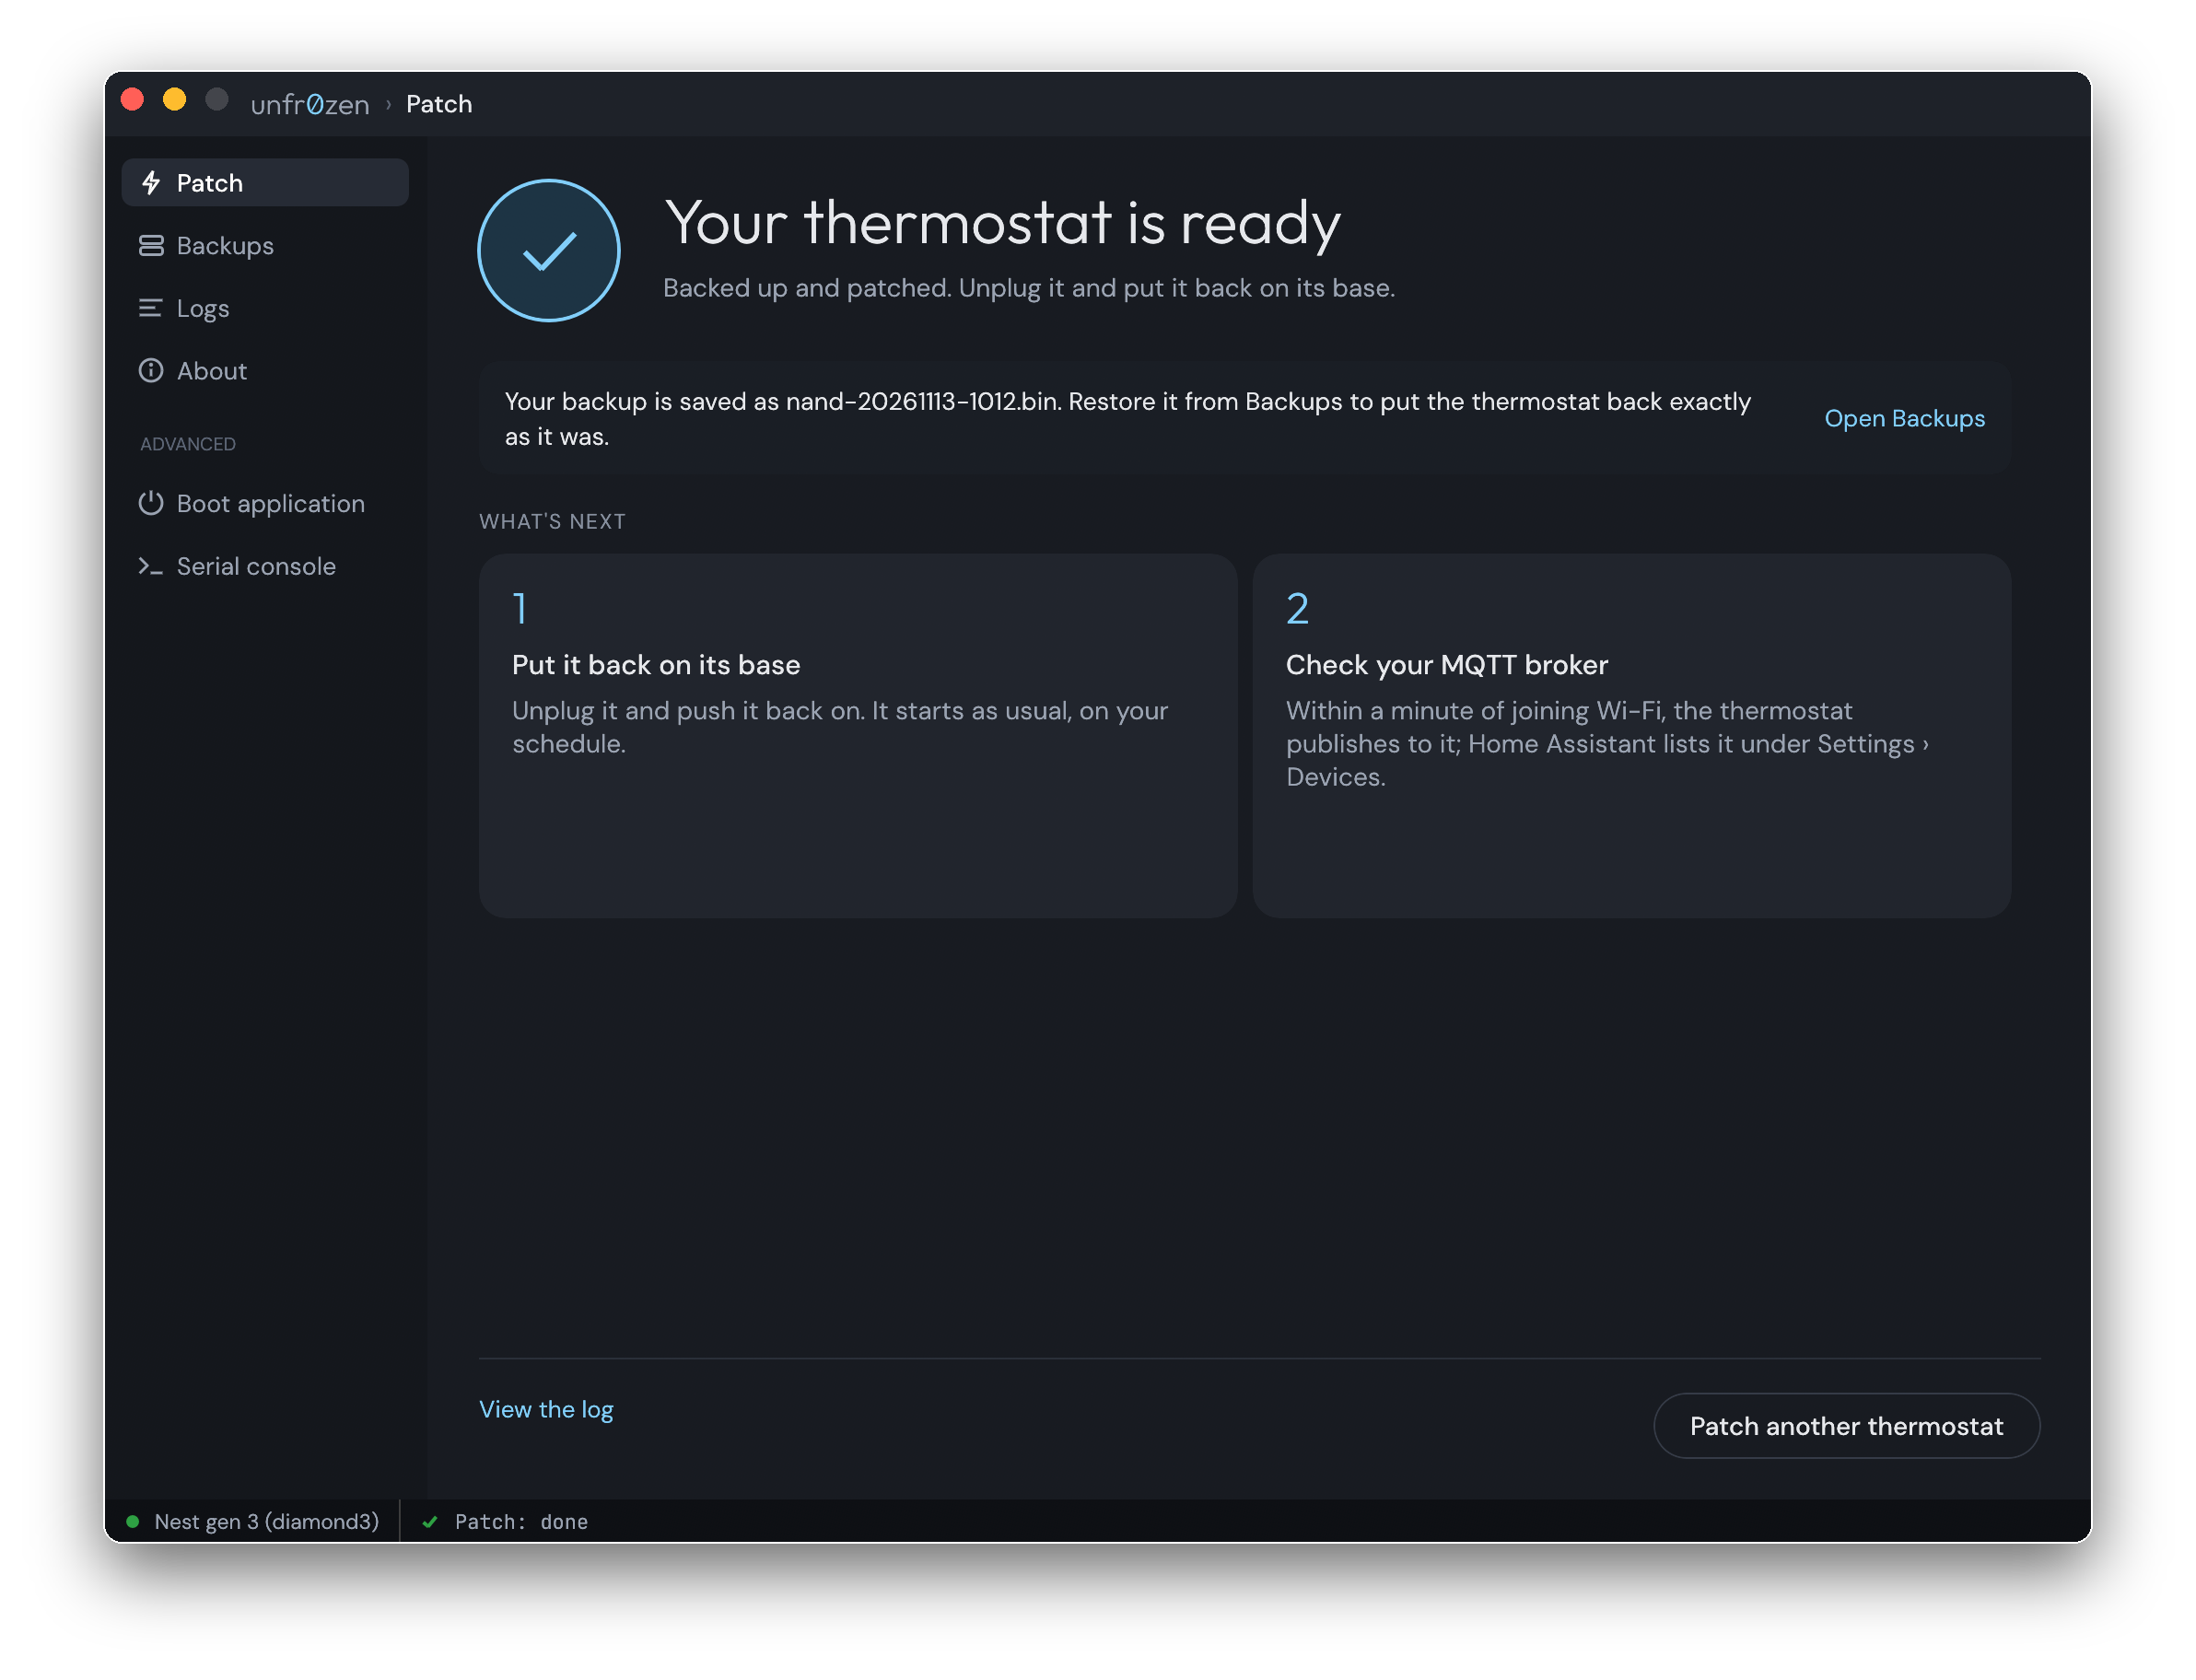
- When the app shows Your thermostat is ready, unplug the cable.
- Push the display back onto its base on the wall until it clicks. It starts as usual, with your schedule.
- Your backup is listed on the Backups page. Keep it: it's how you undo the patch.
1st generation
The 1st generation won't go into USB download mode from its button. Instead, two points on its main board are bridged while the USB cable goes in, which makes its boot ROM wait for the computer.
1Open the display
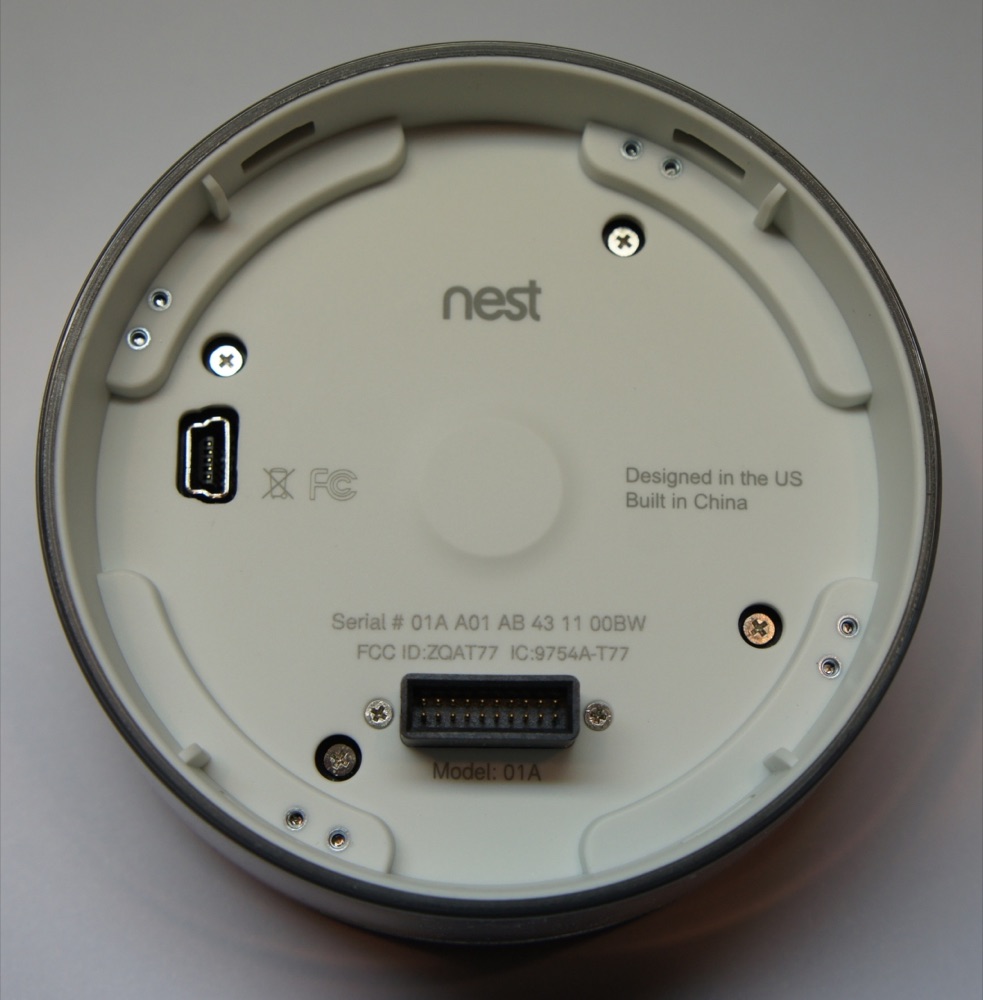
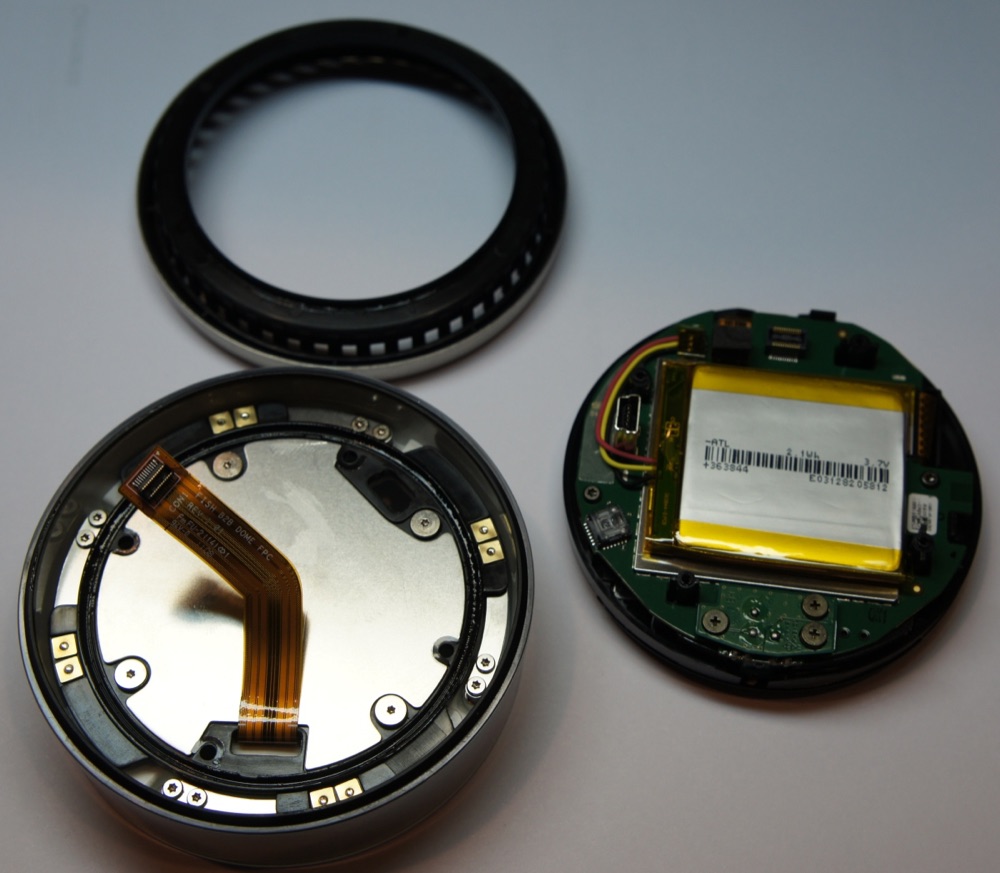
- Take the display off its base.
- Undo the Phillips screws in the grey back cover and lift the board, with its battery, out of the ring. SparkFun's Nest teardown shows the parts in more detail.
- The front connects to the board by a ribbon cable. Leave it in place if you can. If it comes out, lift the connector's latch first, and close the latch on it again when you reassemble.
2Unplug the battery and lift the shield
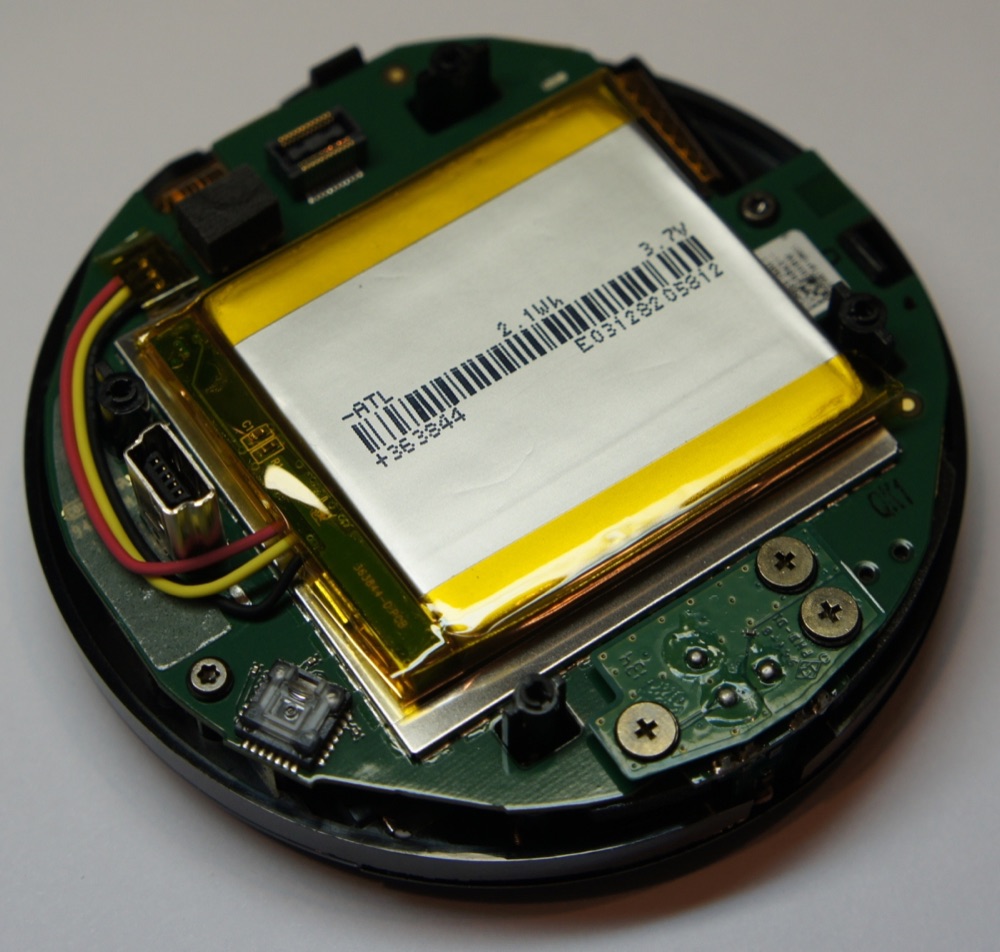
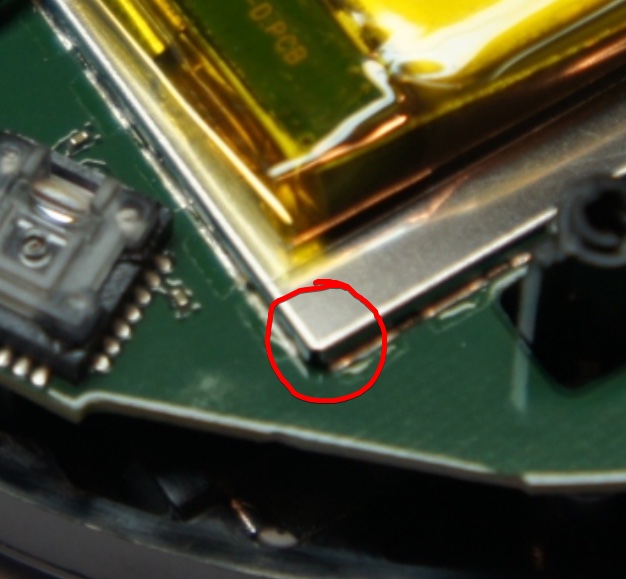
- Unplug the battery: get a fingernail or a plastic tool under its wires at the connector and lift straight up. Don't use anything metal here, which could short the battery.
- Pry the metal shield up, starting at the corner shown, to uncover the components under it.
- Plug the battery back in. The thermostat won't start without it, even on USB. Its screen stays off.
3Find the two points
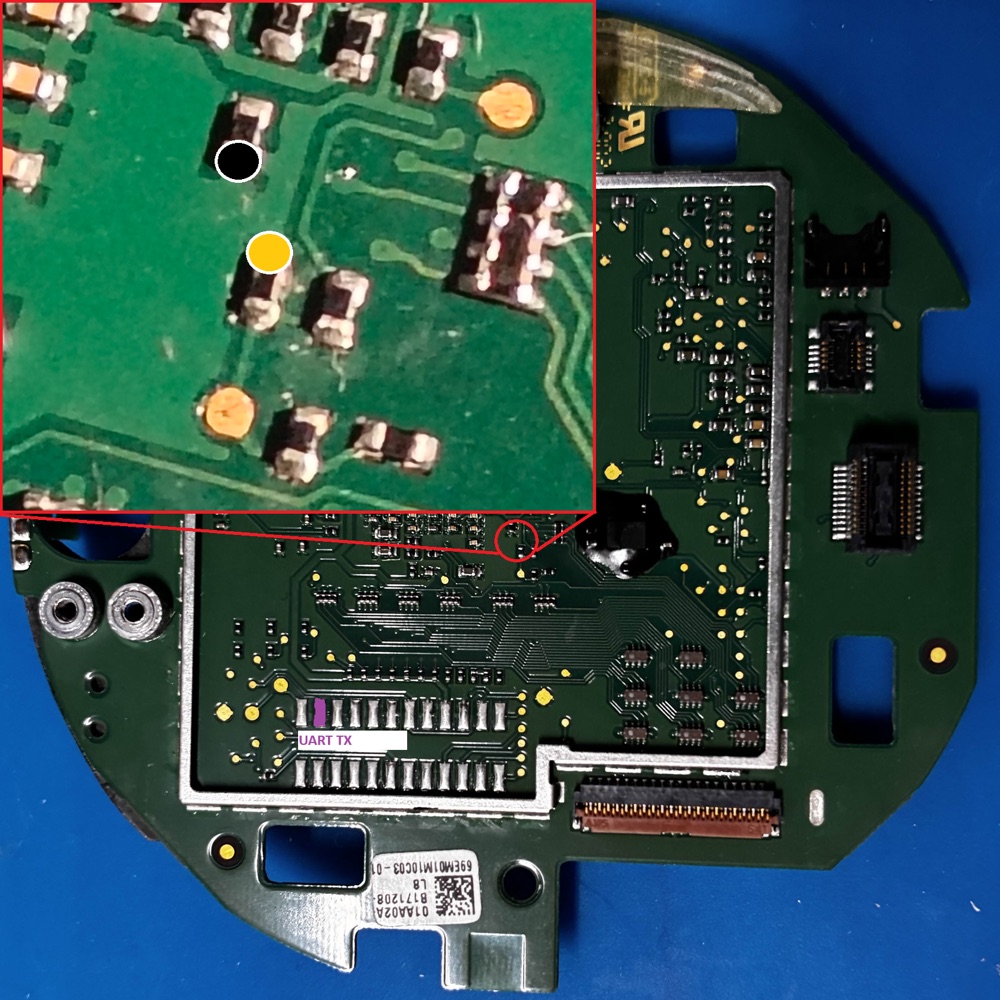
The red circle on the board is enlarged at the top left. You'll touch the yellow and black points with the two tips of a pair of metal tweezers, so find them before the next step.
4Start the patch
- On the Patch page, go through Integrations and Features as for any generation.
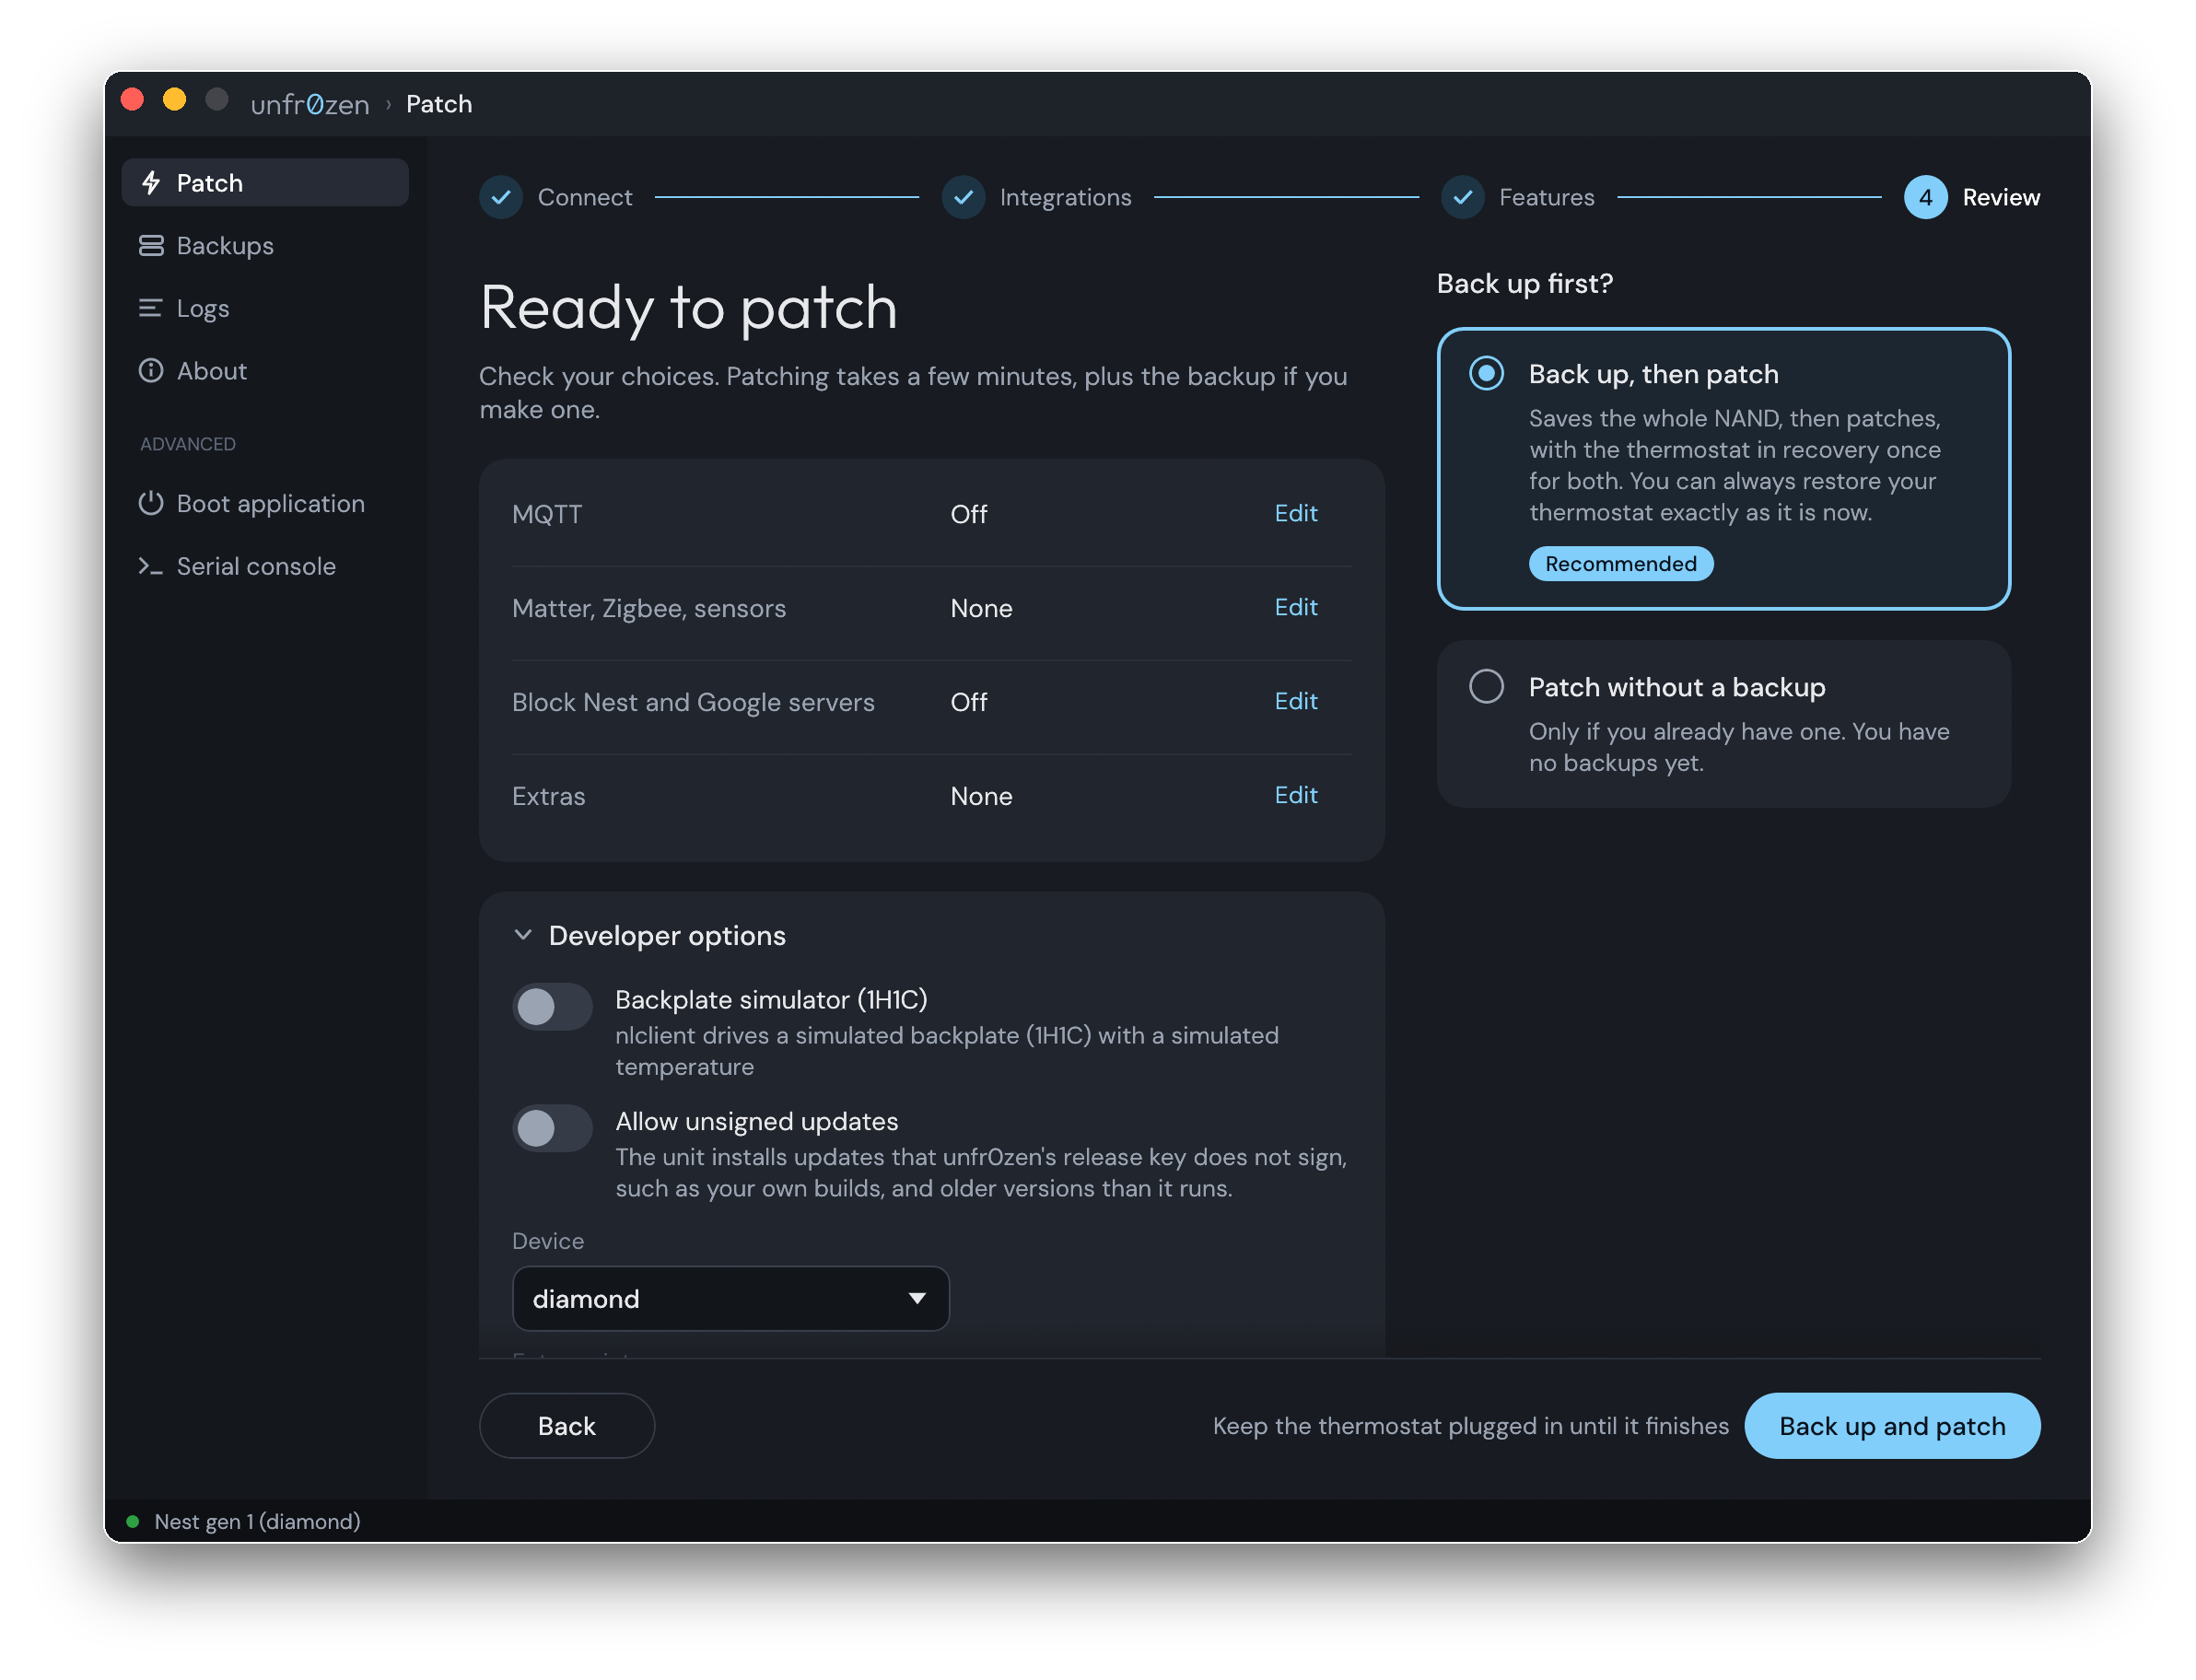
- On Review, open Developer options and set Device to diamond. The 1st and 2nd generations look the same to the computer in download mode, and this tells the app which one to load.
- Leave Back up, then patch selected and click Back up and patch. The app waits for the thermostat in USB download mode.
5Bridge the points and plug in
- With the battery connected and the USB cable not yet plugged into the thermostat, hold the tweezers across the yellow and black points.
- Keep them there and plug the mini-USB cable into the board.
- Once the app moves on from waiting for USB download mode, take the tweezers away.
- Leave everything alone until the app shows Your thermostat is ready.
- Unplug the cable, press the shield back on, reassemble the display and click it onto its base.
With the unfr0zen command-line tool, the same run is unfr0zen --device diamond with your options; bridge and plug in when it waits for the thermostat.
After patching
- For MQTT or Matter, join the thermostat to Wi-Fi from its own menu (Settings → Network) if it isn't already. The network doesn't need internet access.
- Set up Home Assistant, a Matter controller or Zigbee as described under Integrations.
- The patch replaces the Nest cloud connection: the Nest and Google Home apps no longer control the thermostat.
- To change options, run the patch again. To undo it, restore your backup from the app's Backups page (Backup & restore).
Troubleshooting
The app doesn't find the thermostat
- Use a cable that carries data. Many cables only charge, and they're the most common reason a thermostat isn't found.
- Plug into the USB port on the back of the display itself, not the power port of a Nest stand or a Heat Link.
- Plug straight into the computer, not into a hub or a screen.
- Linux: add the USB rule from the download page, then unplug the thermostat and plug it in again.
- Windows, 1st or 2nd generation: the app needs its USB driver, installed after the administrator prompt on the first run. Check that prompt was accepted with Yes.
Windows, 3rd generation: the run stops with ACM interface for 18d1:4ee0 did not appear
An Android driver installed earlier has taken over the thermostat while it's in recovery. Leave it plugged in, in recovery, and:
- Open Device Manager and find Android Bootloader Interface.
- Right-click it: Update driver → Browse my computer → Let me pick → Universal Serial Bus devices → USB Composite Device.
- Run the patch again. Windows keeps the choice.
macOS won't open the app
Allow it once under System Settings → Privacy & Security, as in Get the app. In Terminal, this does the same:
xattr -dr com.apple.quarantine unfr0zen.app2nd or 3rd generation: it doesn't enter USB download mode
Hold the display in a little longer, until the screen goes dark. If the battery is low, leave the display on its base or on USB for a while and try again.
1st generation: nothing happens when plugged in
Check the battery is plugged in, that both tweezer tips touch bare metal at the two points, and that Device is set to diamond. Unplug, bridge the points again, then plug in.
The run stopped part way
Unplug, let the thermostat start, and run the patch again. If it doesn't start, restore your backup from the Backups page, which puts it back as it was.
The thermostat shows error H71 or H74
Some 3rd generation Heat Link models stop on these errors once the Heat Link can no longer connect, which happens with Zigbee or Thread on. Patch again with Works With Nest boiler switched on under Features: the thermostat then heats through its own base. See Zigbee for what changes.
Home Assistant shows the thermostat as unavailable
It shows as available only while the thermostat's software is talking to unfr0zen on the thermostat, and unfr0zen is connected to your MQTT broker. Check that:
- the thermostat is on Wi-Fi (Settings → Network on the thermostat);
- the broker address you gave can be reached from that network;
- the broker's user name and password are right. To change them, run the patch again.
Still stuck?
Open an issue or ask on the Discord, with:
- how you ran it: the app or the command line (with its options), and your computer's system;
- the run's full log, from the app's Logs page, which keeps every run's;
- what the thermostat's screen showed.
Credits
- The 1st generation's download-mode method and the photos of its shield and contact points: cuckoo_loader_gen1 by guyman70718.
- The photos of the opened 1st generation: SparkFun's Nest Thermostat Teardown, CC BY-SA 4.0, resized here.